First time signing into Ladder?
Follow these steps if you are unsure about how to sign in as a first time user:
Step 1:
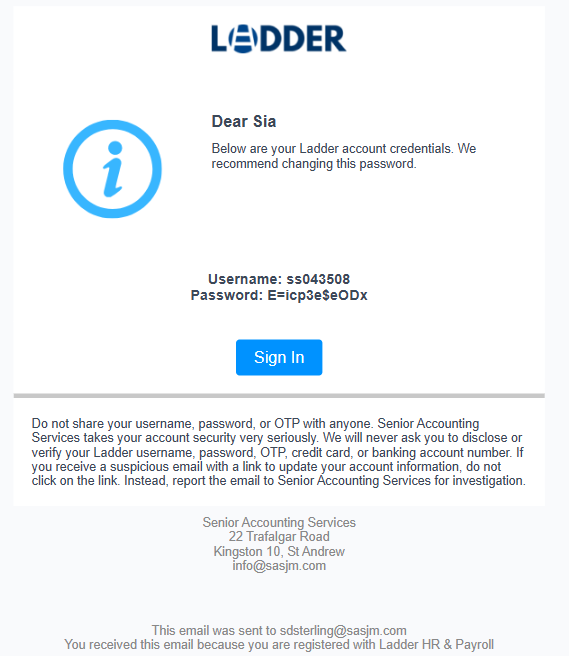
For the first time sign, your employer will provide you with your username and a temporary password in your work email. Check your respective email provider for an email from Ladder which will look like the following email.
Warning
The information shared to your email must not be shared to anyone other than a certified customer service Ladder employee.
Step 2:
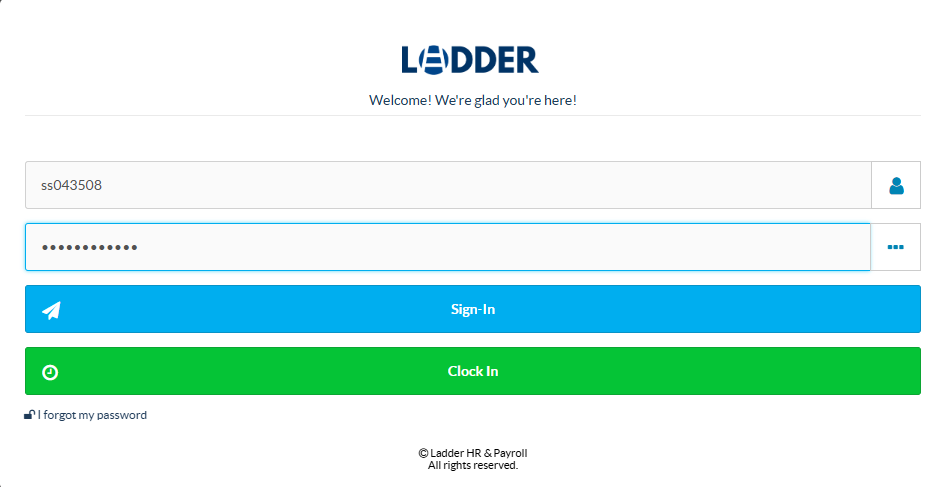
Navigate to the Ladder website and enter your details into sign in page.
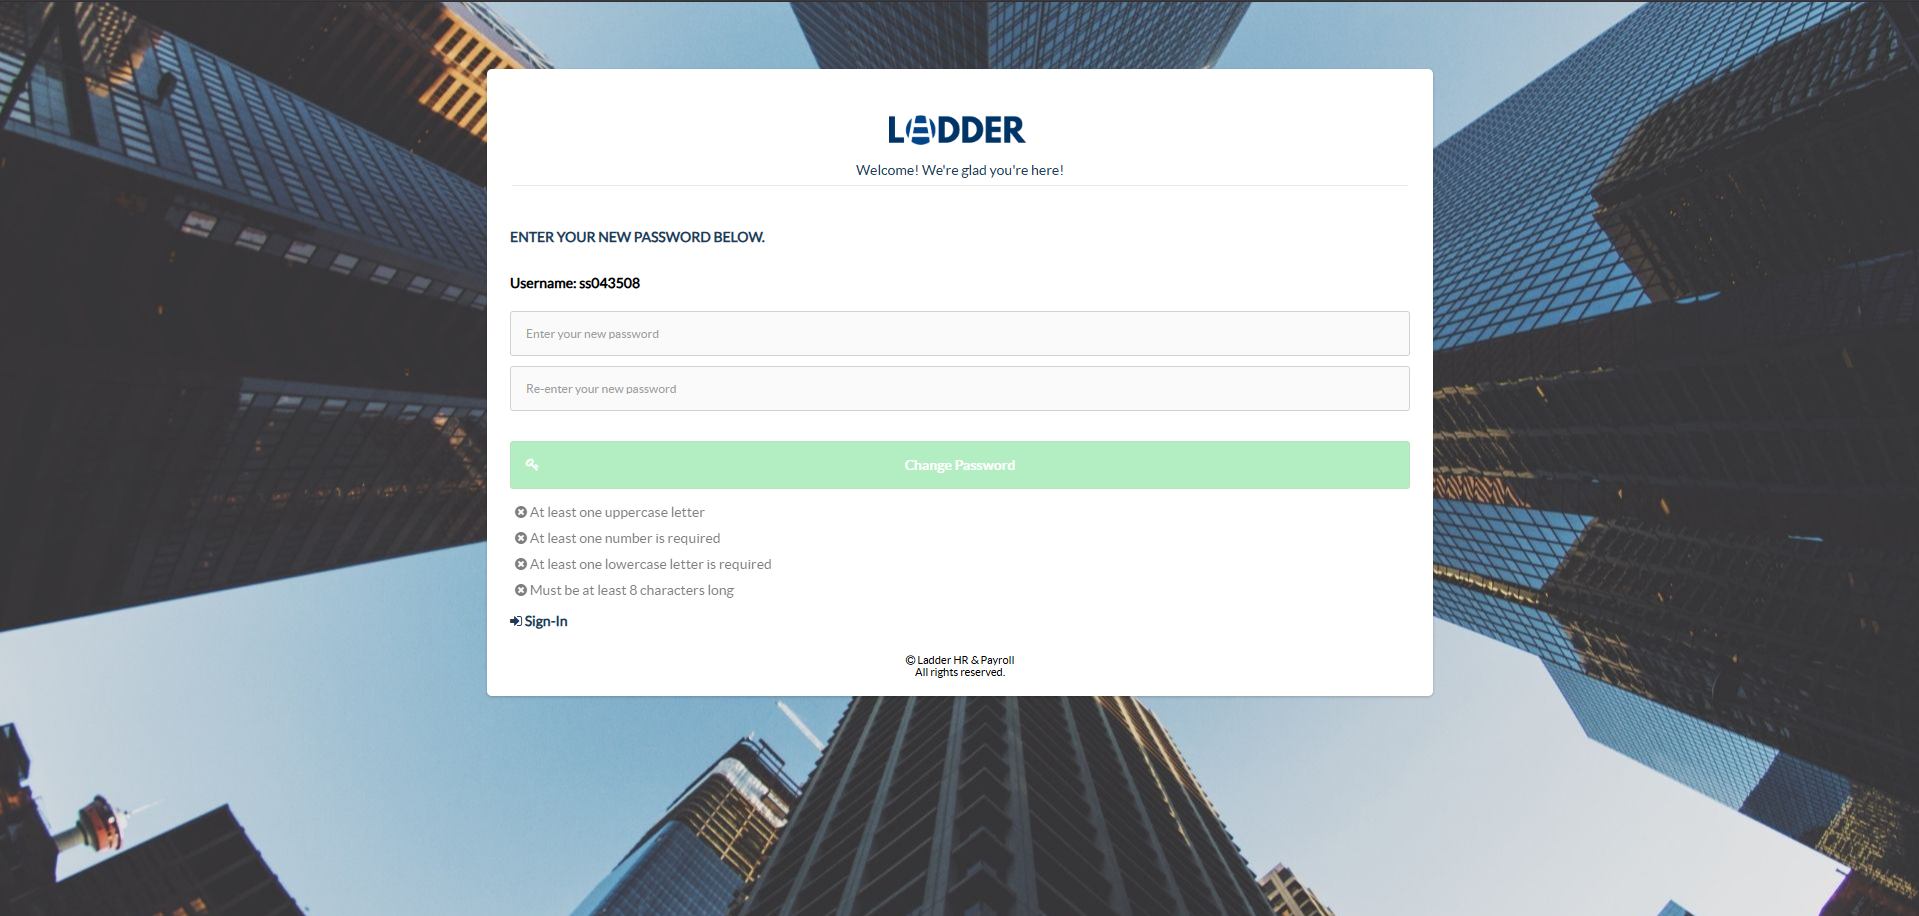
Upon entering the necessary credentials, you will be redirected to a new page where you will have to enter a new custom password of your own for the account. When finished press Change Password.
Afterwards you will be signed in and redirected to the Ladder Application
Tip
Create a strong password by using a combination of uppercase and lowercase letters, numbers, and special characters. Avoid using easily guessed information like your name, birthday, or common words. Aim for at least 12 characters for better security.
Resetting Password
Forgot your password? Don’t worry, it happens to the best of us—and also to you. Ladder makes resetting your password a simple and secure process.
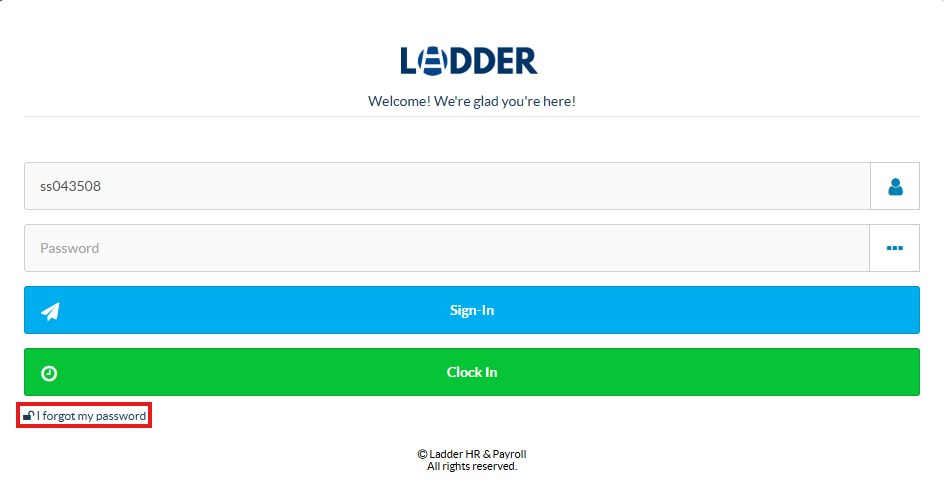
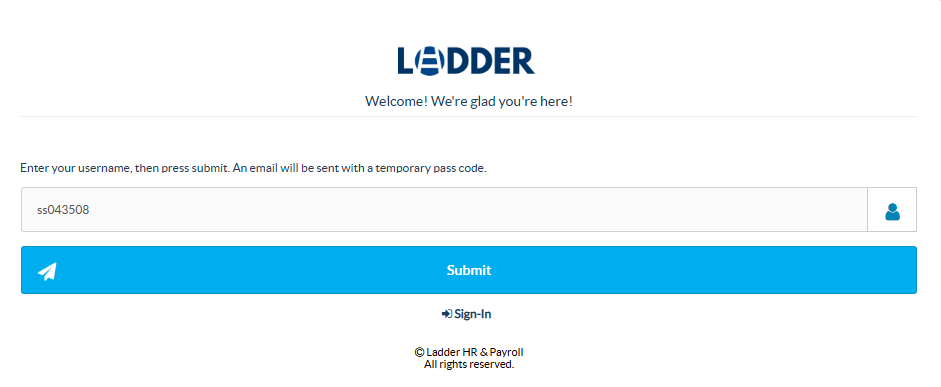
Step 1:
Go to the sign in page and click the "I forgot my password" icon.
Step 2:
Upon clicking the button you will be directed to a new page and prompted to submit your username.
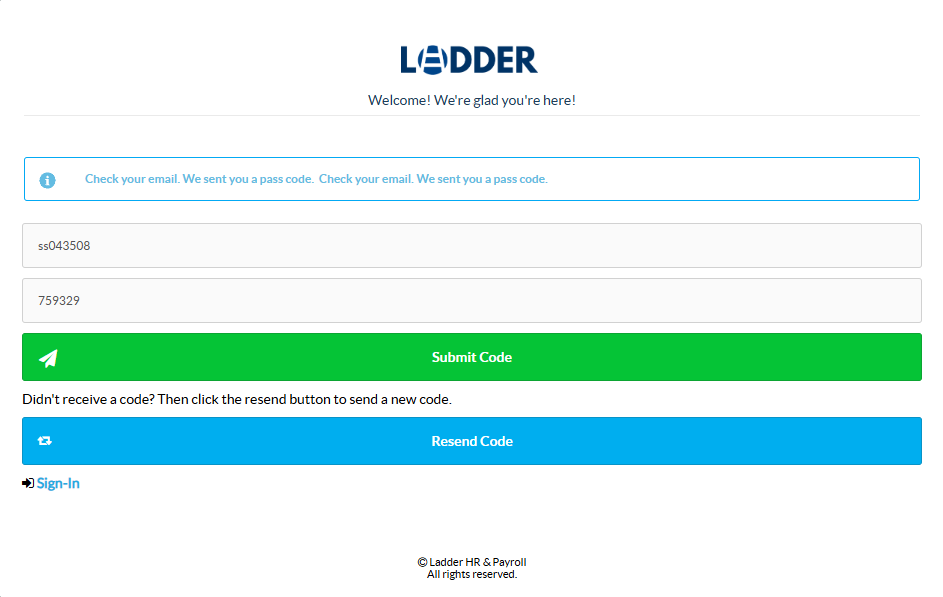
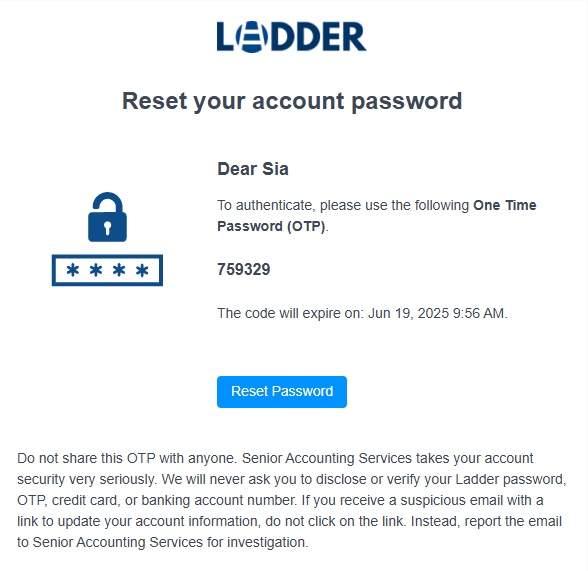
After clicking submit you will be redirected to a new page where you are required to enter an One time Password (OTP). The OTP will be sent to the email address associated with the username.
Note
The One time Password will expire in 10 minutes. Once the time has elapsed or the code is not working, click Resend Code and check your email for a new one.
The email will look like the image below.
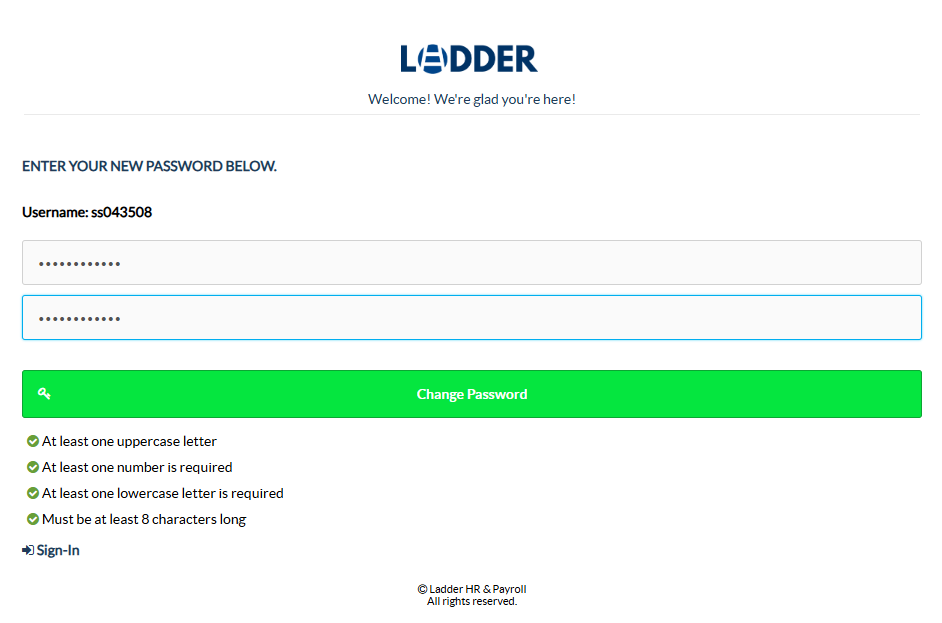
Step 3:
Upon clicking submit the you will be redirected to another page to enter a new custom password.
Tip
Create a strong password by using a combination of uppercase and lowercase letters, numbers, and special characters. Avoid using easily guessed information like your name, birthday, or common words. Aim for at least 12 characters for better security.
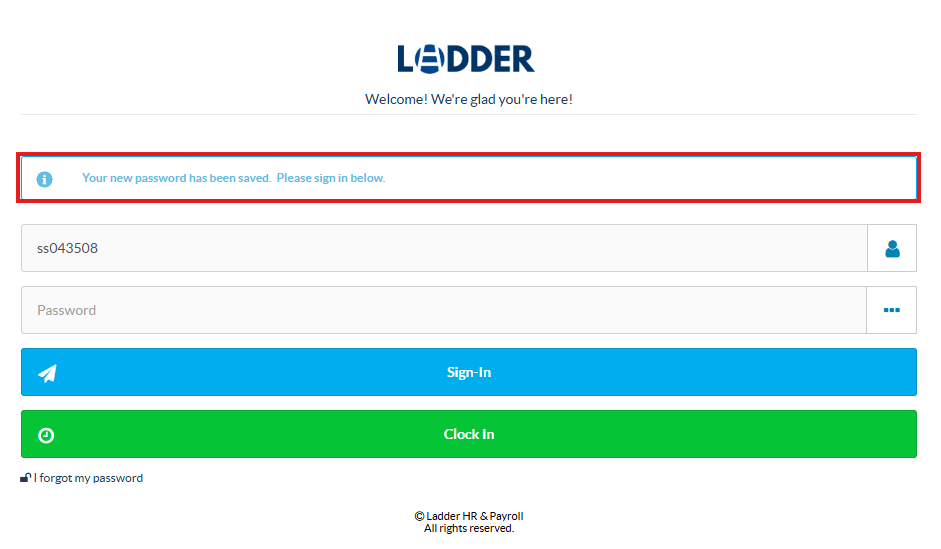
After clicking Change Password, you will be sent to the sign in page and shown a conformation message stating that the password was successfully changed.
Now using the new password created sign into Ladder.
Clocking In
Ladder’s Clock-In feature is designed to simplify and streamline employee time tracking. With just a tap, employees can clock in to mark the start of their workday, log breaks during the day, and clock out when their shift ends. Once clocked out, the system automatically calculates their total hours worked and generates accurate pay based on their time entries. This feature ensures transparency, reduces manual errors, and helps both employees and employers stay on top of productivity and payroll with ease.
How do I use the clock in feature?
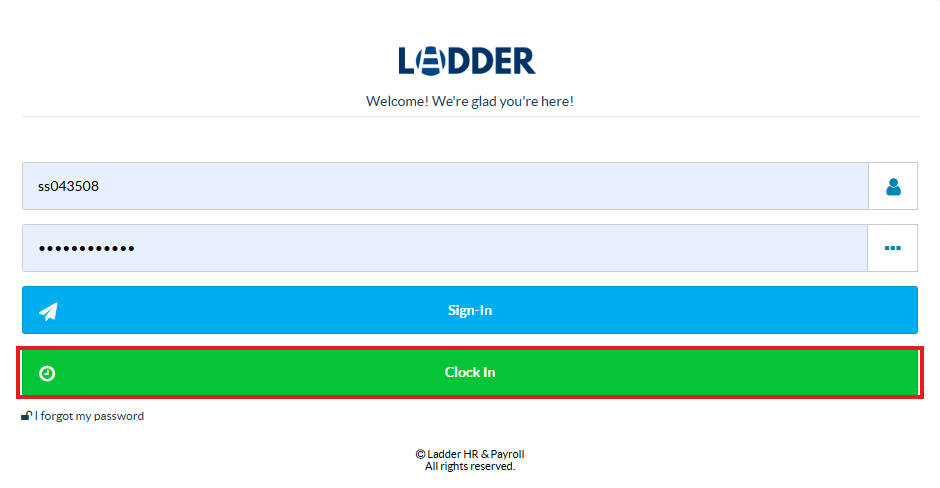
Step 1:
Navigate to the Ladderja sign in screen. Enter your username and password and click clock in.
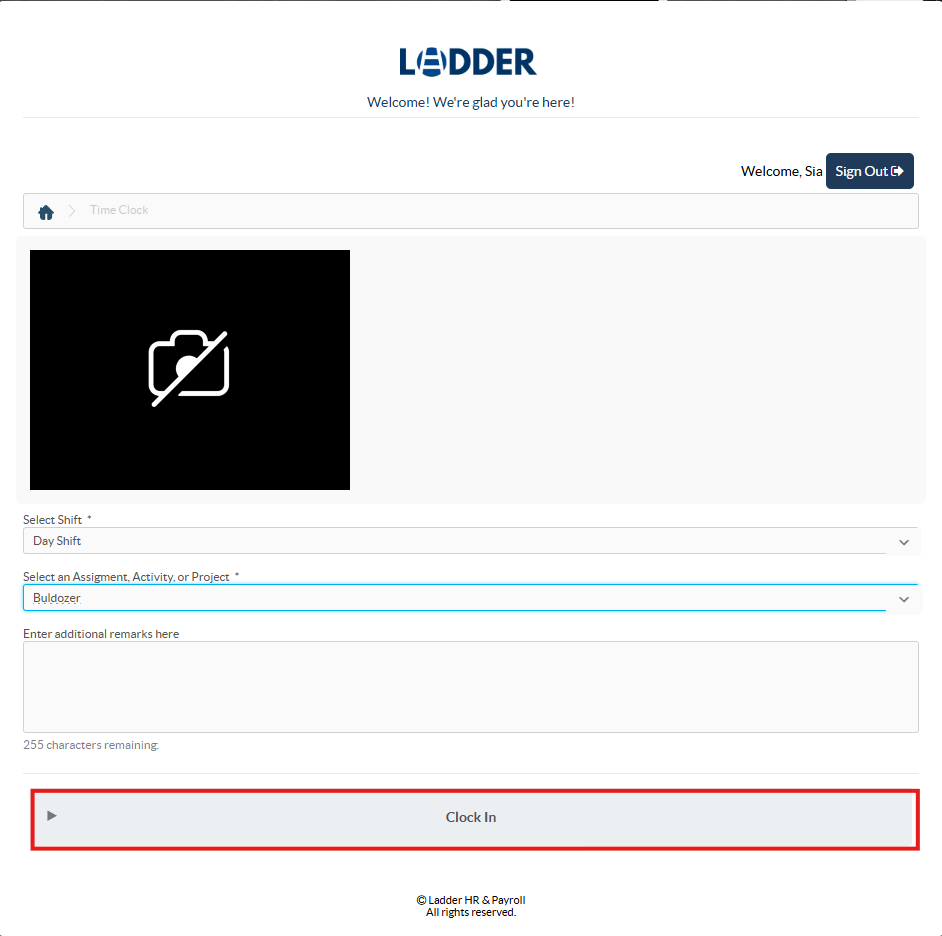
Step 2:
Upon entering the correct credentials, you will be directed to the Clock in menu. Fill out the necessary fields by clicking the down arrow and selecting an option.
Note
You must first give Ladder access to your camera so that it can take a photo.
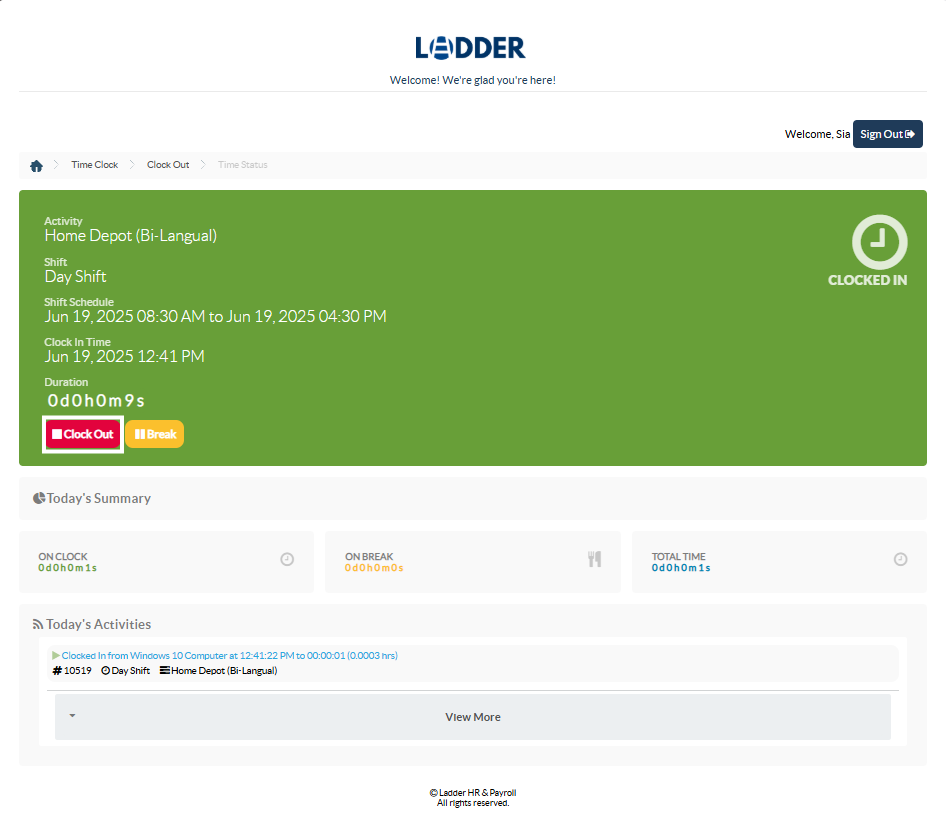
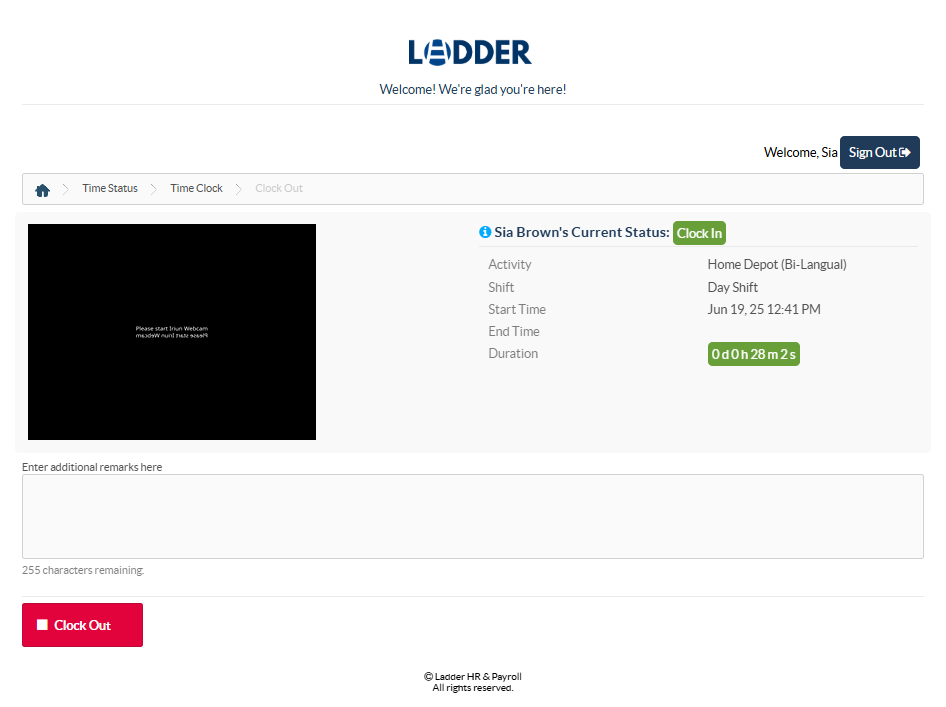
Upon clicking "Clock In", the system will take a photo of yourself using your webcam then redirect you to the Time Status page.
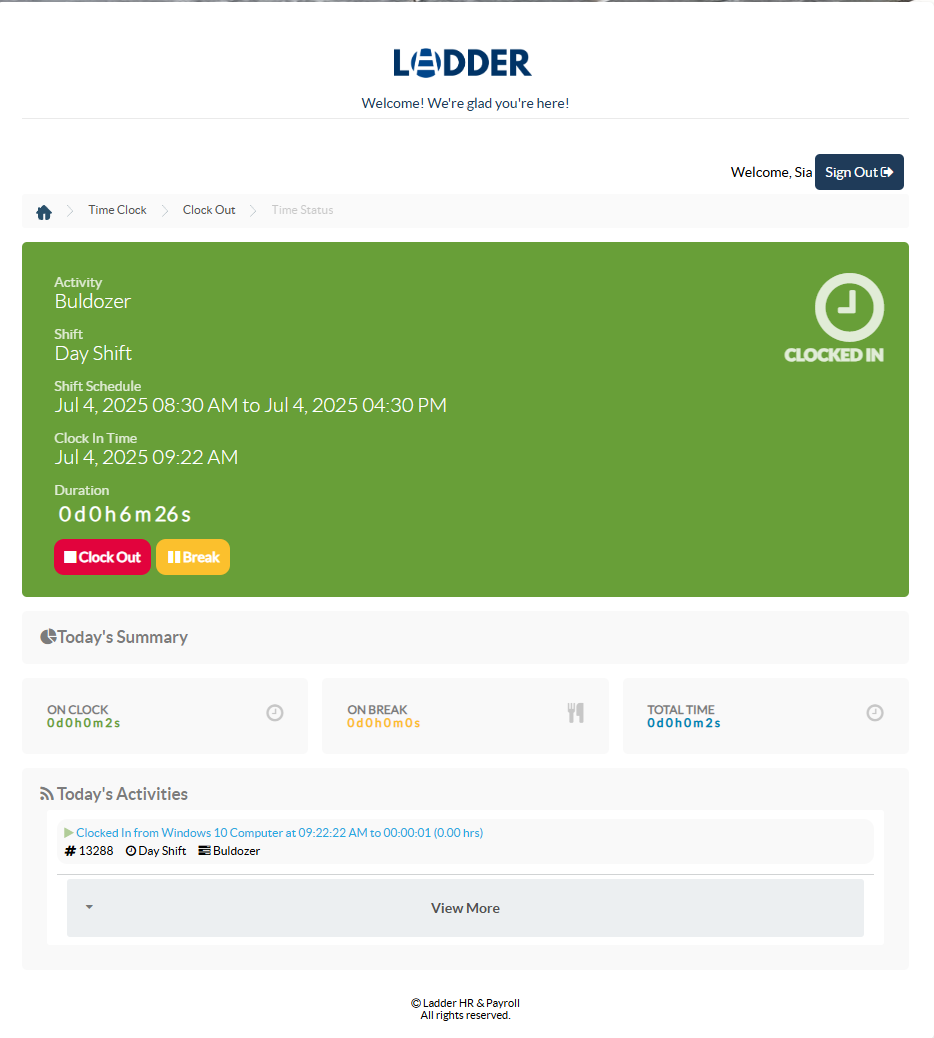
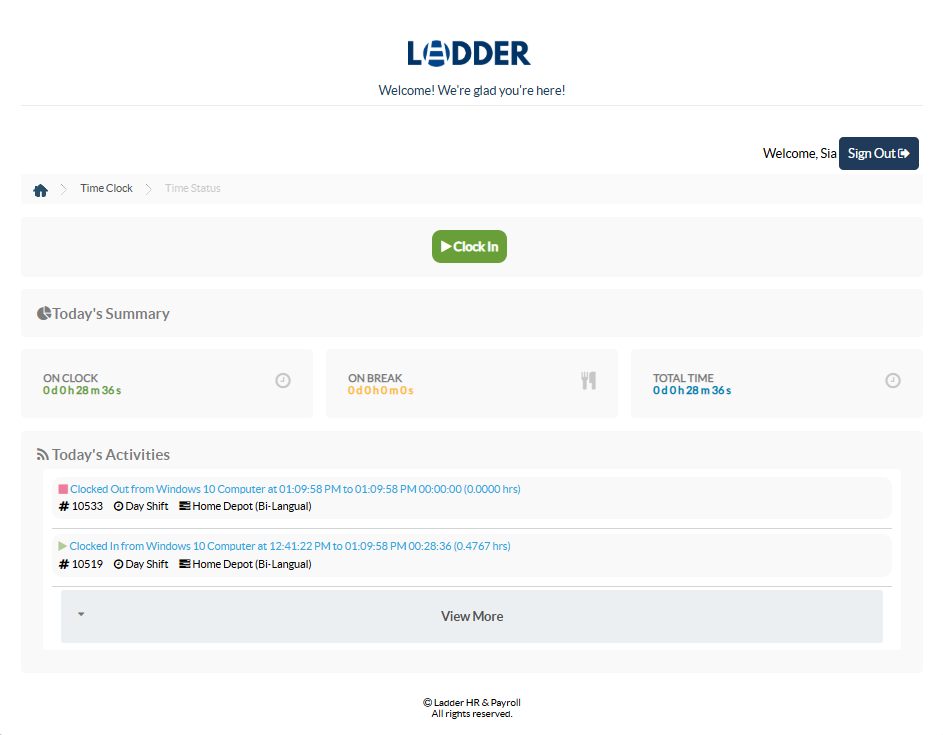
Now that you have successfully clocked into Ladder, there are some features that you must know how to use. These include:
- Breaks
- Clocking Out
- Daily Summary
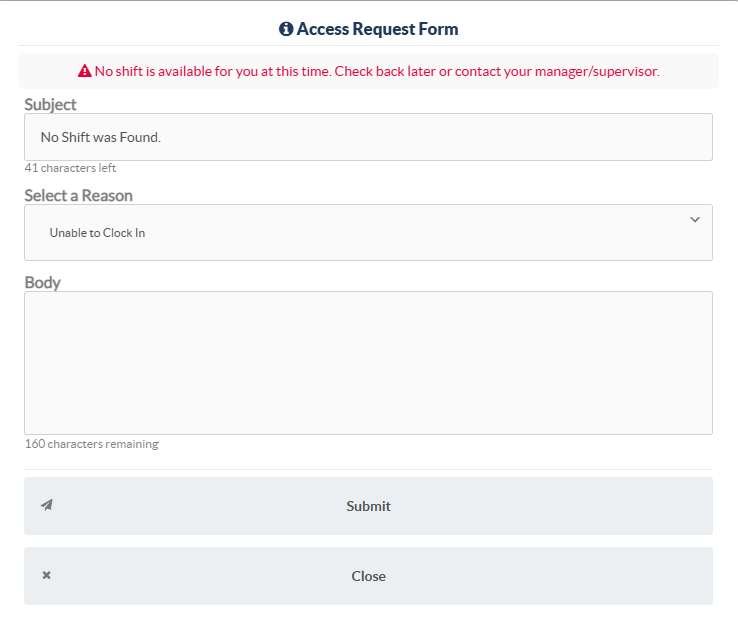
Unable to Clock In?
When no assignment is assigned to you by your employer, the Access Request Form - like the one showed below would be displayed to you. This prevents employee from clocking into the system when they are not supposed to be working on an activity.
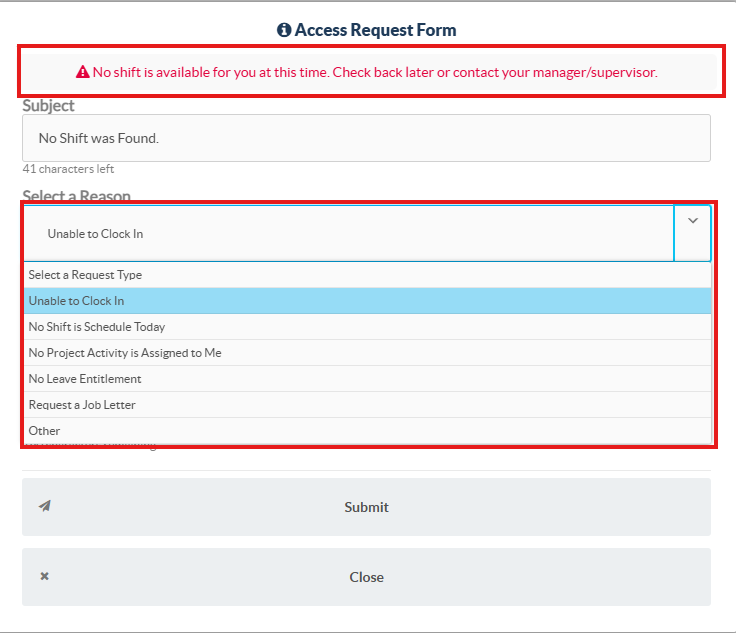
To rectify this issue, a message must be sent to your employer so they can assign an activity to you. Simply select the reason why you are unable to clock in. This is normally found at the top of the form written in red.
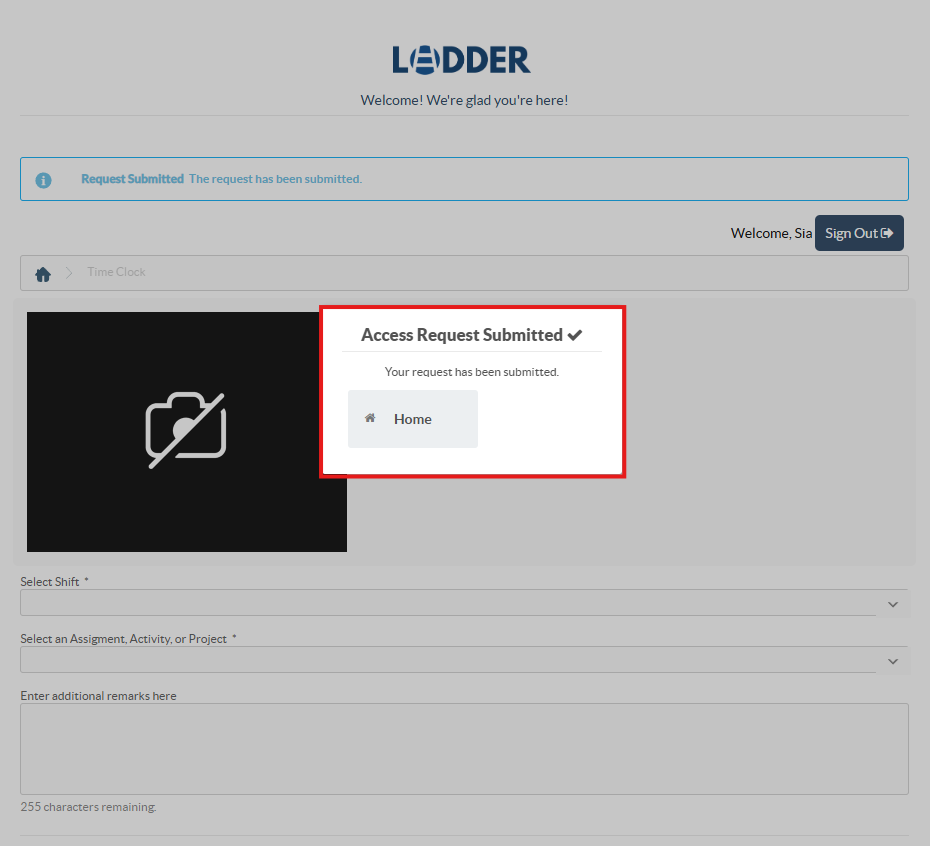
Afterwards you will see a section to enter a body of text. This section is optional but can be used to send further remarks to your employer. After entering all the fields and clicking "Submit", your form will be sent to your employer via email where they will then take the relevant action.
A confirmation message will be shown afterwards.
Clocking Out
Ladder’s Clock-Out feature brings your workday to a smooth and efficient close. When employees clock out, the system records the end of their shift, accounts for any breaks taken, and calculates total hours worked. Immediately after, Ladder automatically processes their pay based on the recorded time and sends an email to their employer.
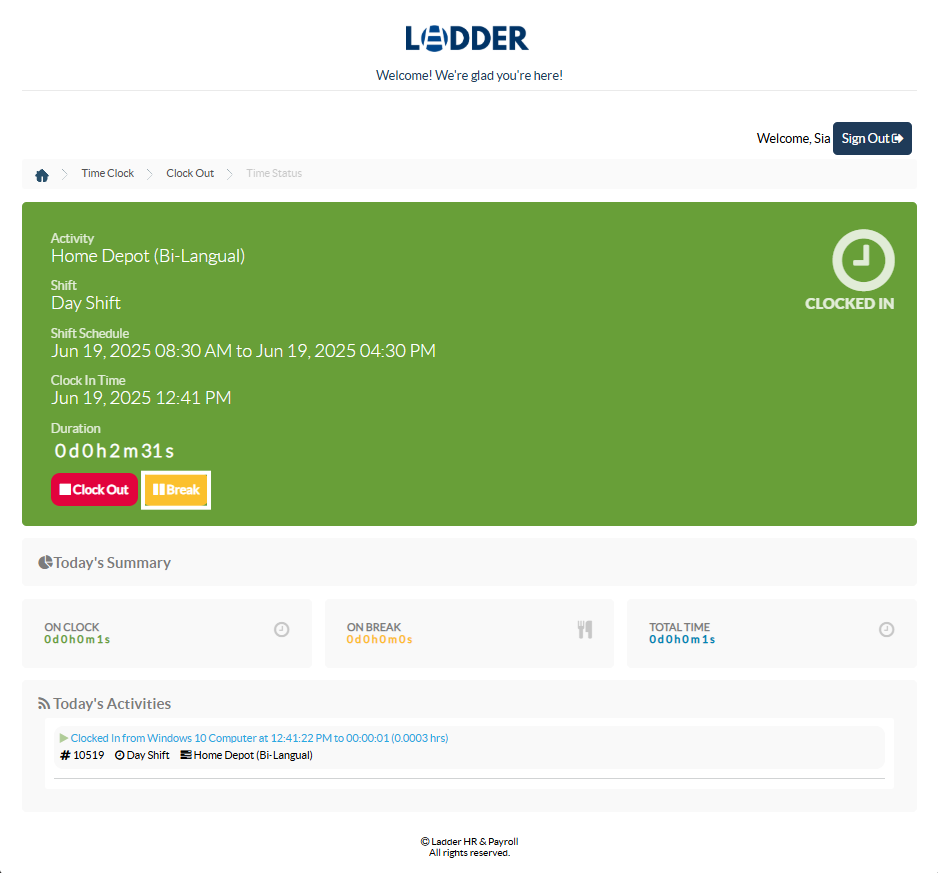
By clicking the "Clock Out" button, you will be sent to another screen asking you to confirm that you want to clock out.
Clicking "Clock Out" button will end your shift/activity and show you a summary which includes:
- Duration you have worked.
- Time at which you clocked into Ladder.
- Breaks taken and their duration.
- Time at which you clocked out of Ladder.
Note
The system will automatically clock out an employee once the scheduled end time for their shift or activity—set by the employer—has passed.
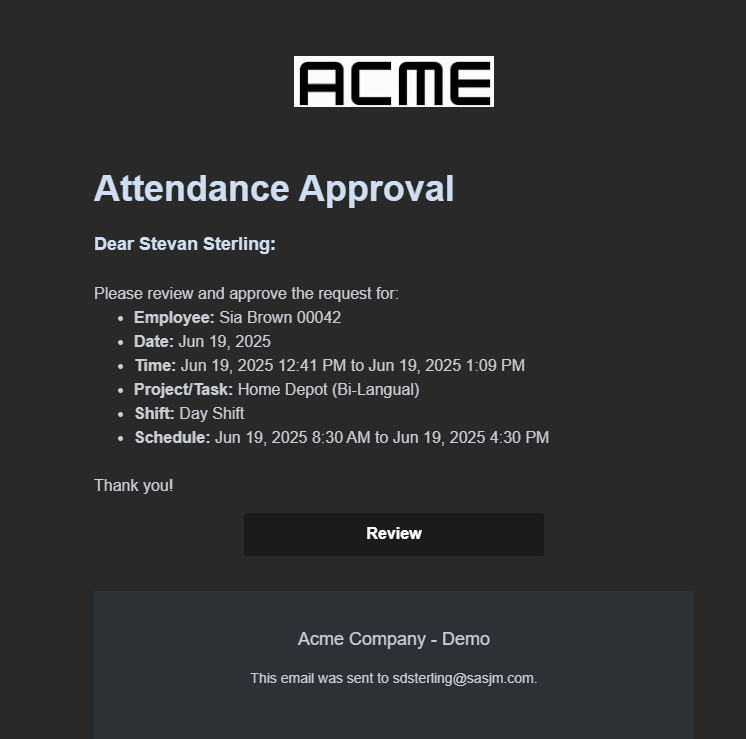
Additionally, employers will be notified through email when their employee clocks out. The email will look like this:
Taking Breaks
The Break feature in Ladder allows employees to log their rest periods. Whether it's a lunch break or a quick pause during the day, users can clock in and out of breaks directly within the app. This ensures that all time away from work is properly recorded, helping maintain accurate work hour calculations and fair payroll processing.
Note
The system will prompt the users at regular intervals to ask users if they are still working. If the user fails to answer the prompt the system will automatically put them on break.
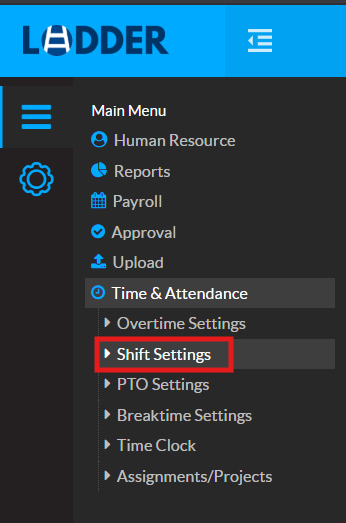
Creating a Shift Rule
Step 1:
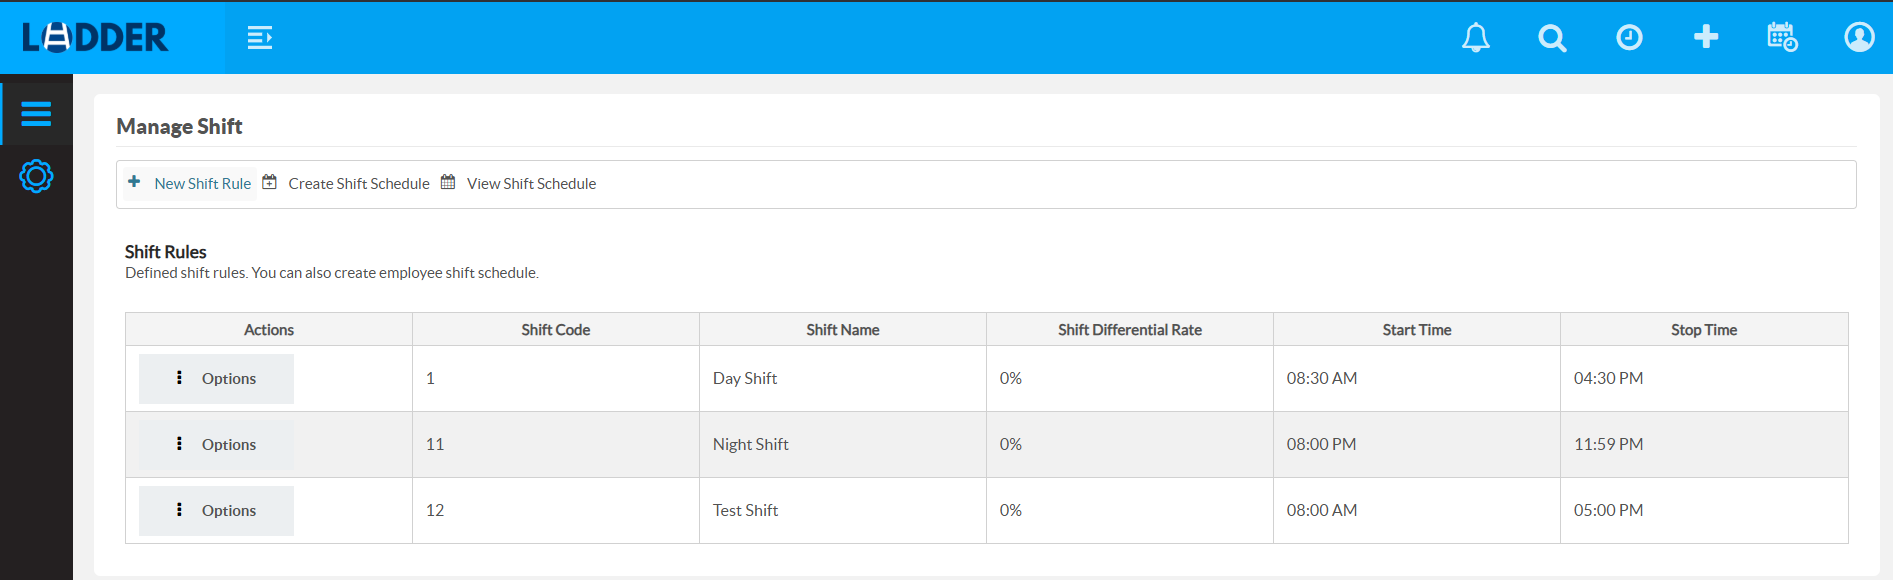
Navigate to the side bar menu and select Time & Attendance. Under this heading you will select the option Shift Settings.
You should then be redirected to the following screen.
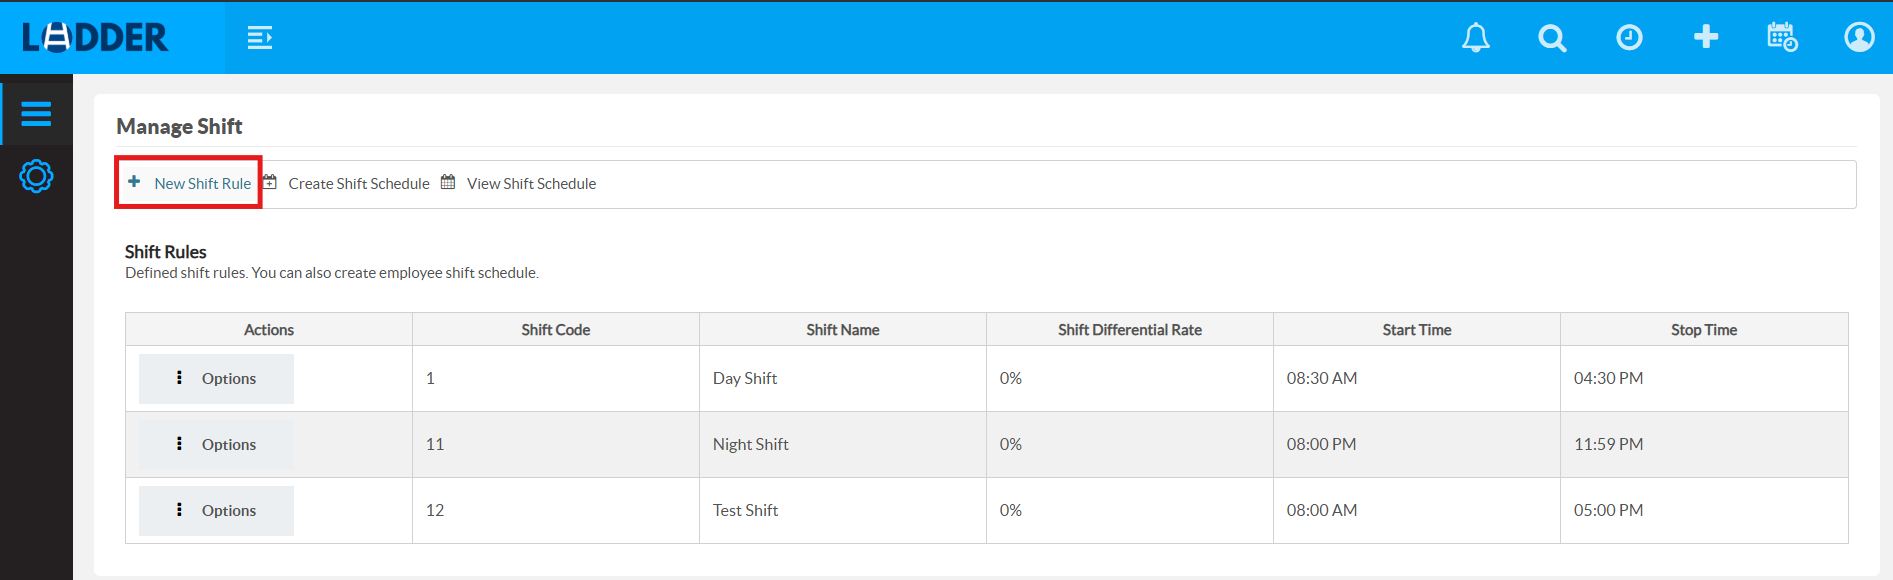
Step 2:
Click New Shift Rule.
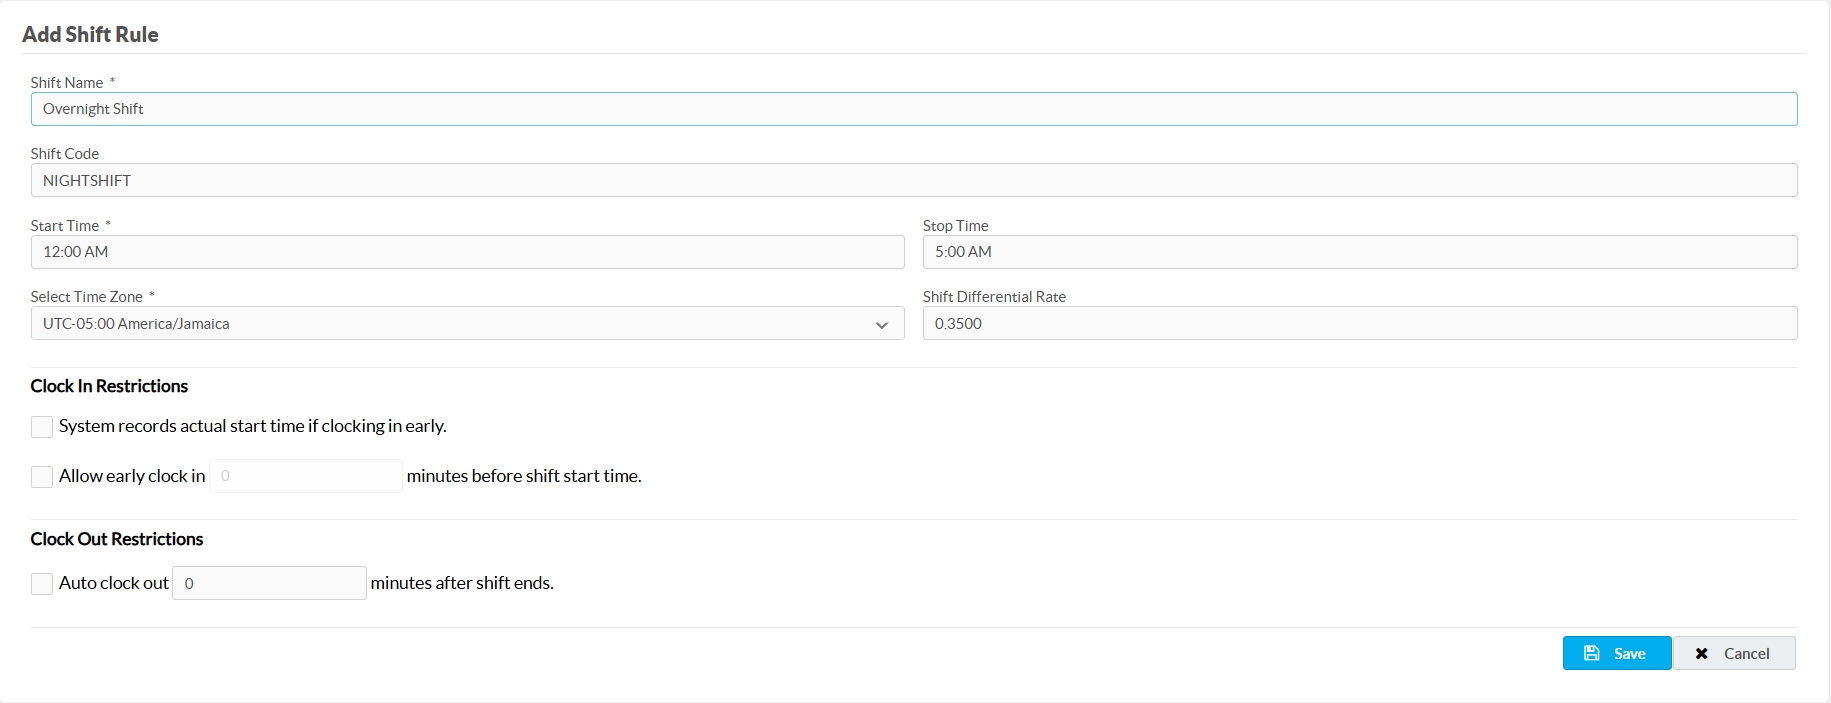
This will redirect you to the Add Shift Rule page where you will be required to set out the rules for the new shift.
When completed click Save in the bottom right hand corner of the page.
What is "Shift Differential Rate"?
This refers to how much additional pay an employee will earn during a certain shift based on a percentage of the employee's base salary. The system records this entry in decimal format.
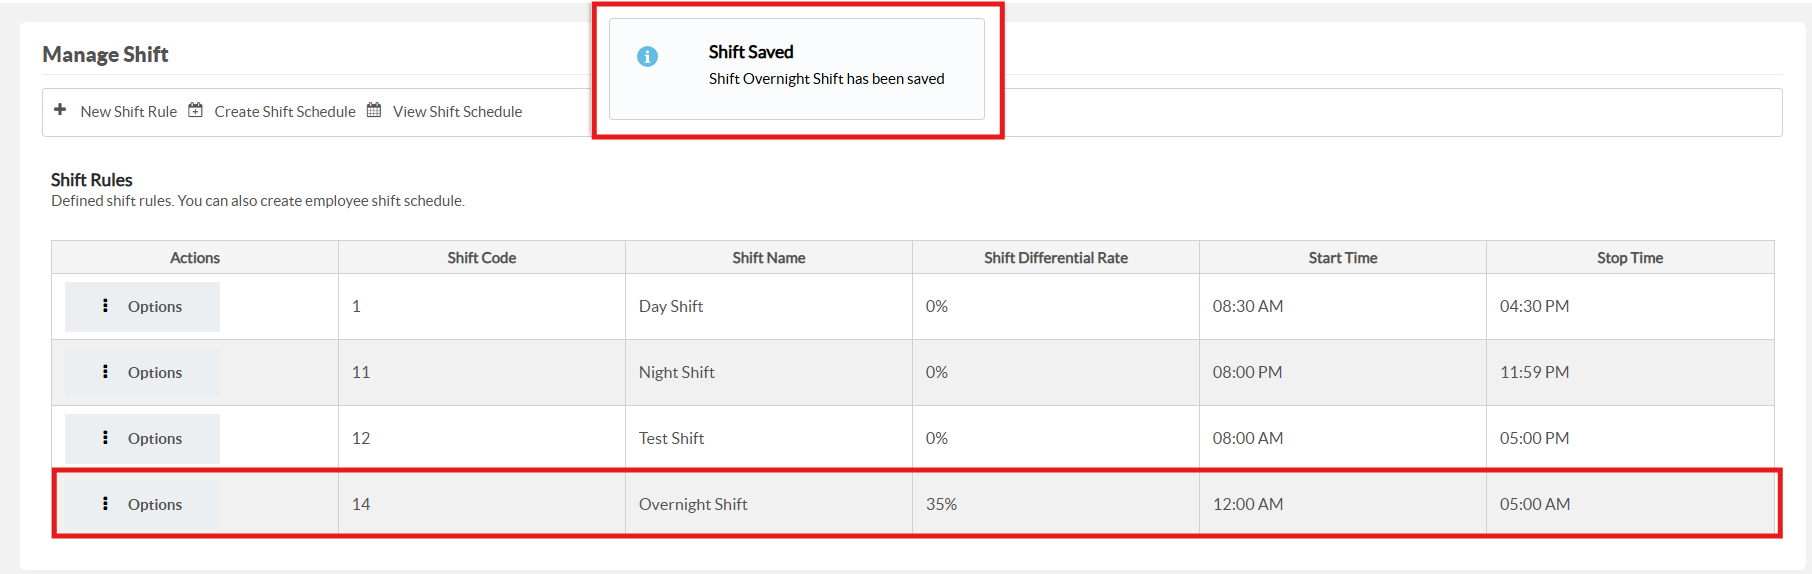
After clicking save the system will redirect you to the Manage shift page, where a confirmation message will be displayed and the new shift rule added.
Editing a Shift Rule
To edit any of your shift rules, you simply need to:
Click the Options button beside the rule you wish to change. Then select Edit in the drop down menu.
You will then be sent to the Add Shift Rule page where you will be able to edit the shift rule.
Creating a Shift Schedule
When creating a Shift Schedule, employers can set the number of days an employee will work on an activity, assign the shift, and optionally set a daily hour limit for that activity.
This section will go through how to create a shift schedule as well as the features that you may come across.
Step 1:
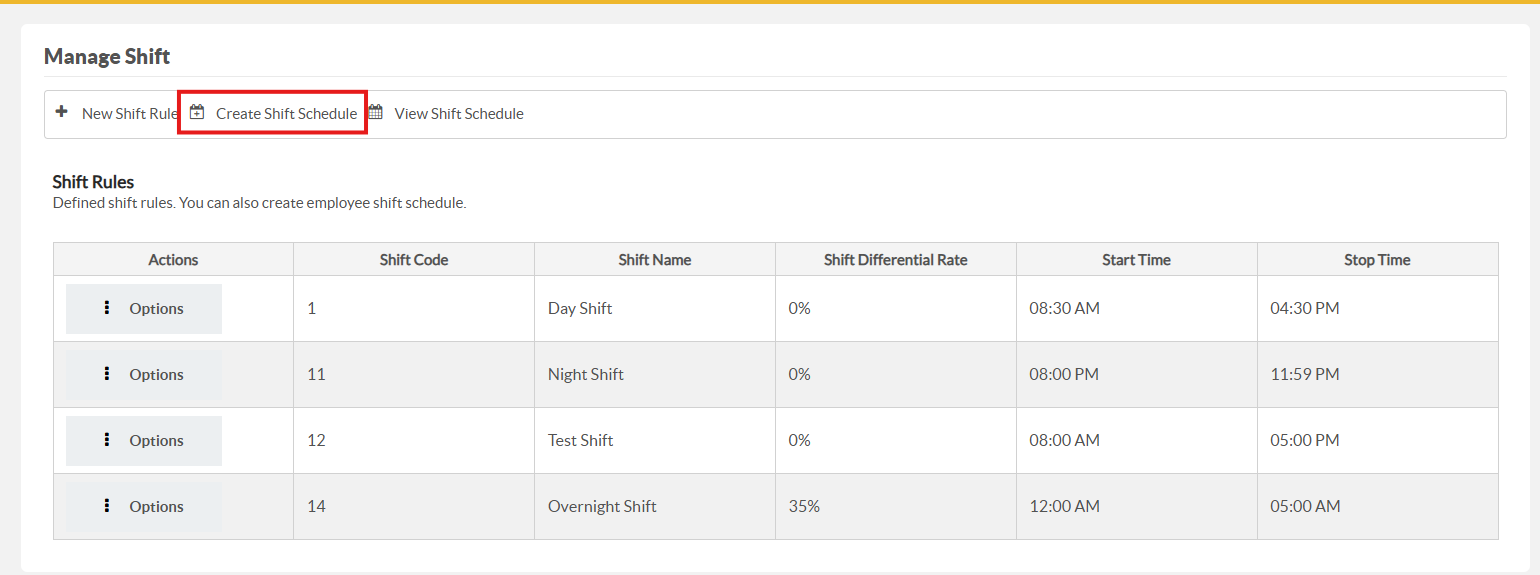
Navigate to the side bar menu and select Time & Attendance. Under this heading you will select the option Shift Settings.
You should then be redirected to the following screen, where you will click the "Create Shift Schedule".
Step 2:
Upon clicking the button, you will be redirected to the Create Shift Schedule page. Here you are required to select a shift, whether it be Day, Night or Overnight Shift. Afterwards you will need to select a start and end date for the schedule.
At the bottom, you’ll see the option “Implement a daily work hour maximum.” This sets a daily limit for how long a user can work on an activity. Once the limit (usually set in the employee's contract) is reached, the user is auto clocked out. If not enabled, the system will continue tracking time until the user clocks out or misses check-in prompts.
Selecting “Override daily maximum work hours” lets you set a custom hour limit for a specific activity, regardless of the employee’s contract limit.
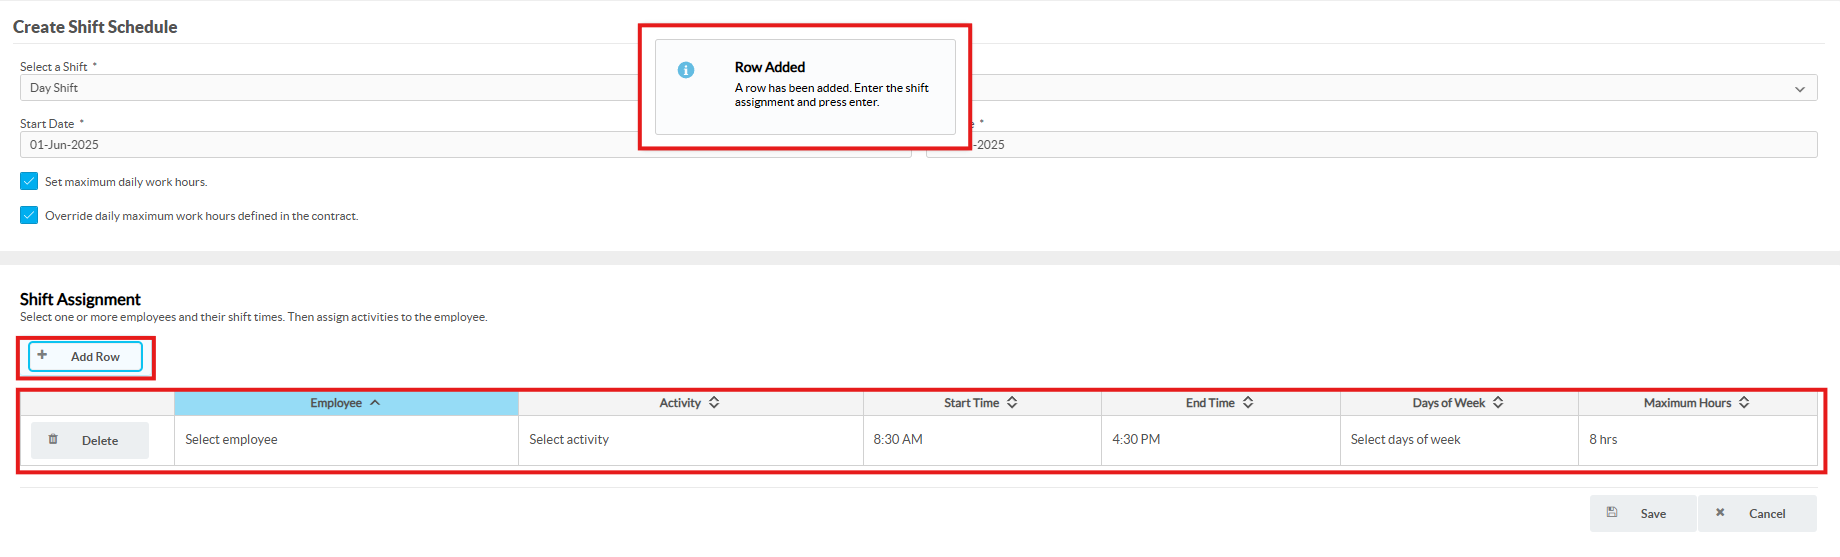
Step 3:
Once you have defined the shift schedule, click the "Add Row" button. This will create a new row where you will be required to:
- Select an employee.
- Assign them an activity.
- Set the start and end time for that activity.
- If the override daily maximum button was chosen, then the daily maximum hours will need to be entered.
Note
The hours for the start and end time for the activities should not overlap.
Step 4:
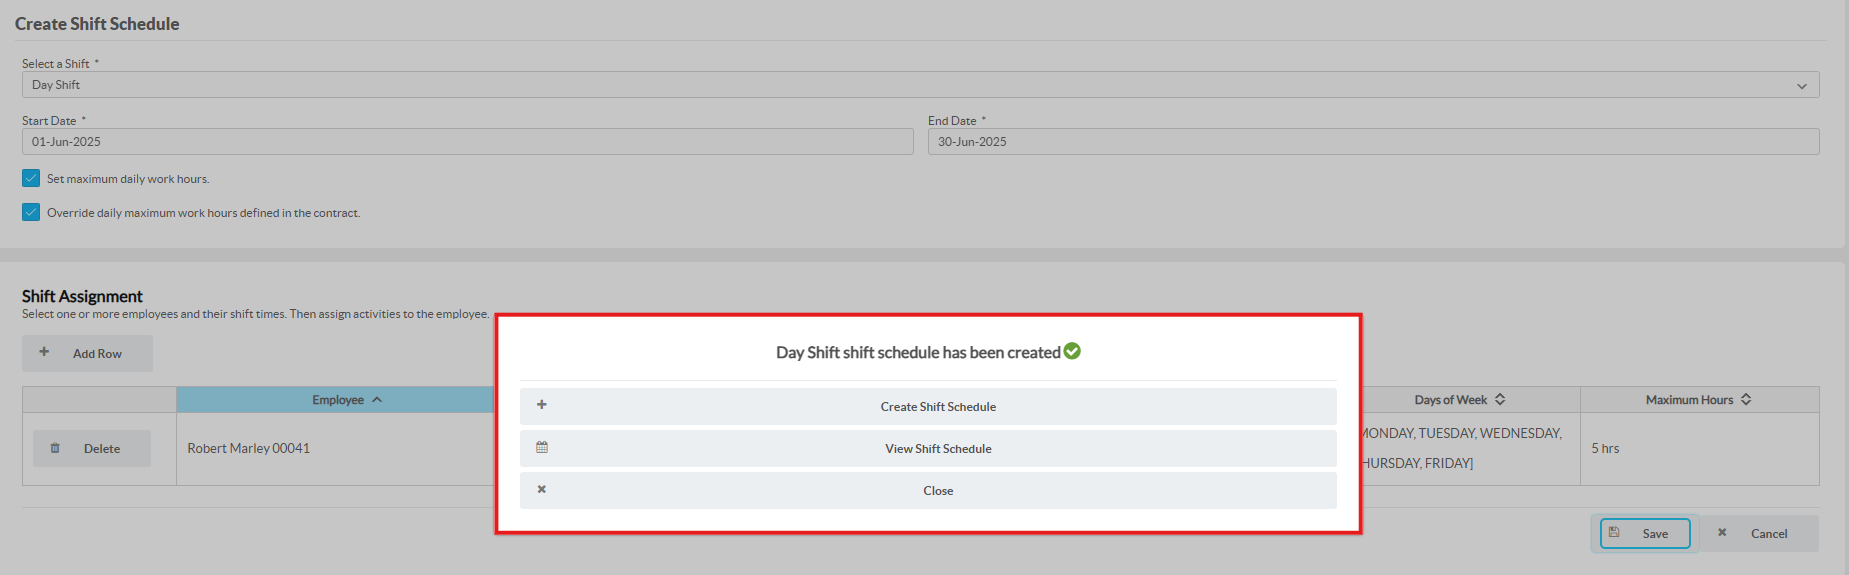
After filling out the required fields, click the Save button.
A confirmation message will then be displayed to you. The message also provides options to:
- Create another Shift Schedule.
- View your Shift schedules.
- Close confirmation message.
Viewing and Editing a Shift Schedule
The next feature we will discuss is viewing and editing your shift schedules. By following these steps you can see how Ladder make this process very quick and easy.
Step 1:
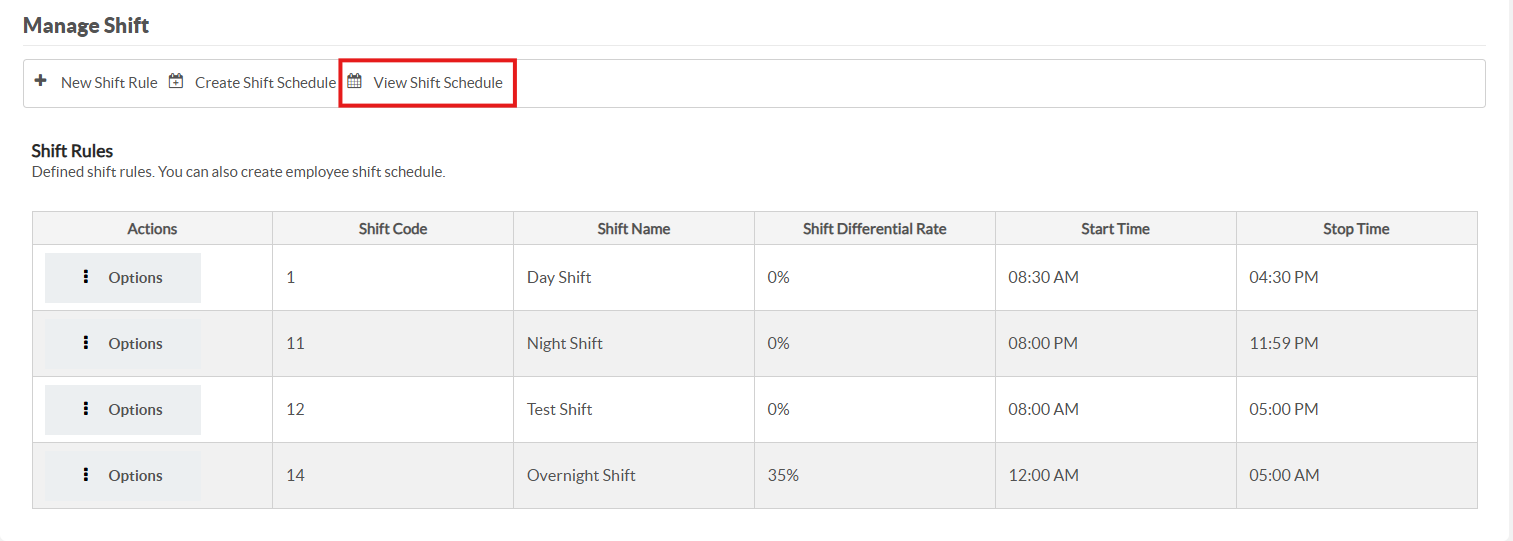
Navigate to the side bar menu and select Time & Attendance. Under this heading you will select the option Shift Settings.
You should then be redirected to the following screen, where you will click the "View Shift Schedule" button.
Step 2:
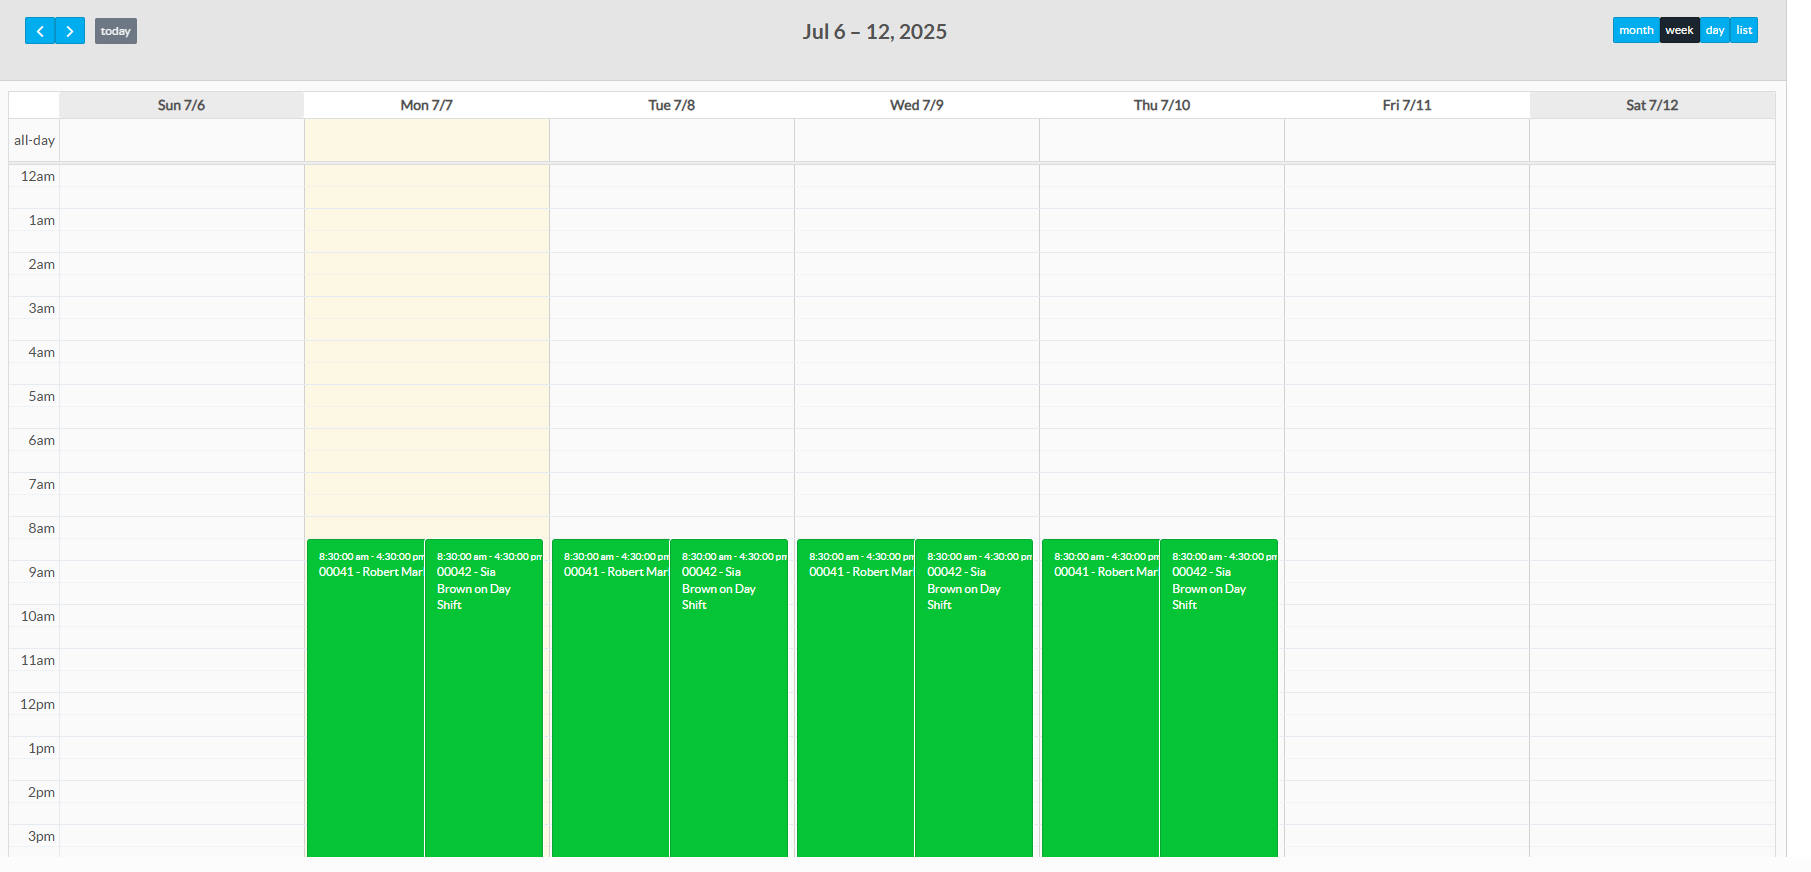
Upon clicking the button, you will be redirected to the Employee Shift Schedule page, where you are required to search for the necessary employee(s). Additionally, you are able to narrow your search to the employee's respective department and shift.
After finding the employee, click "Search" or press "Enter" on your keyboard. Then scroll down to see their shift schedule.
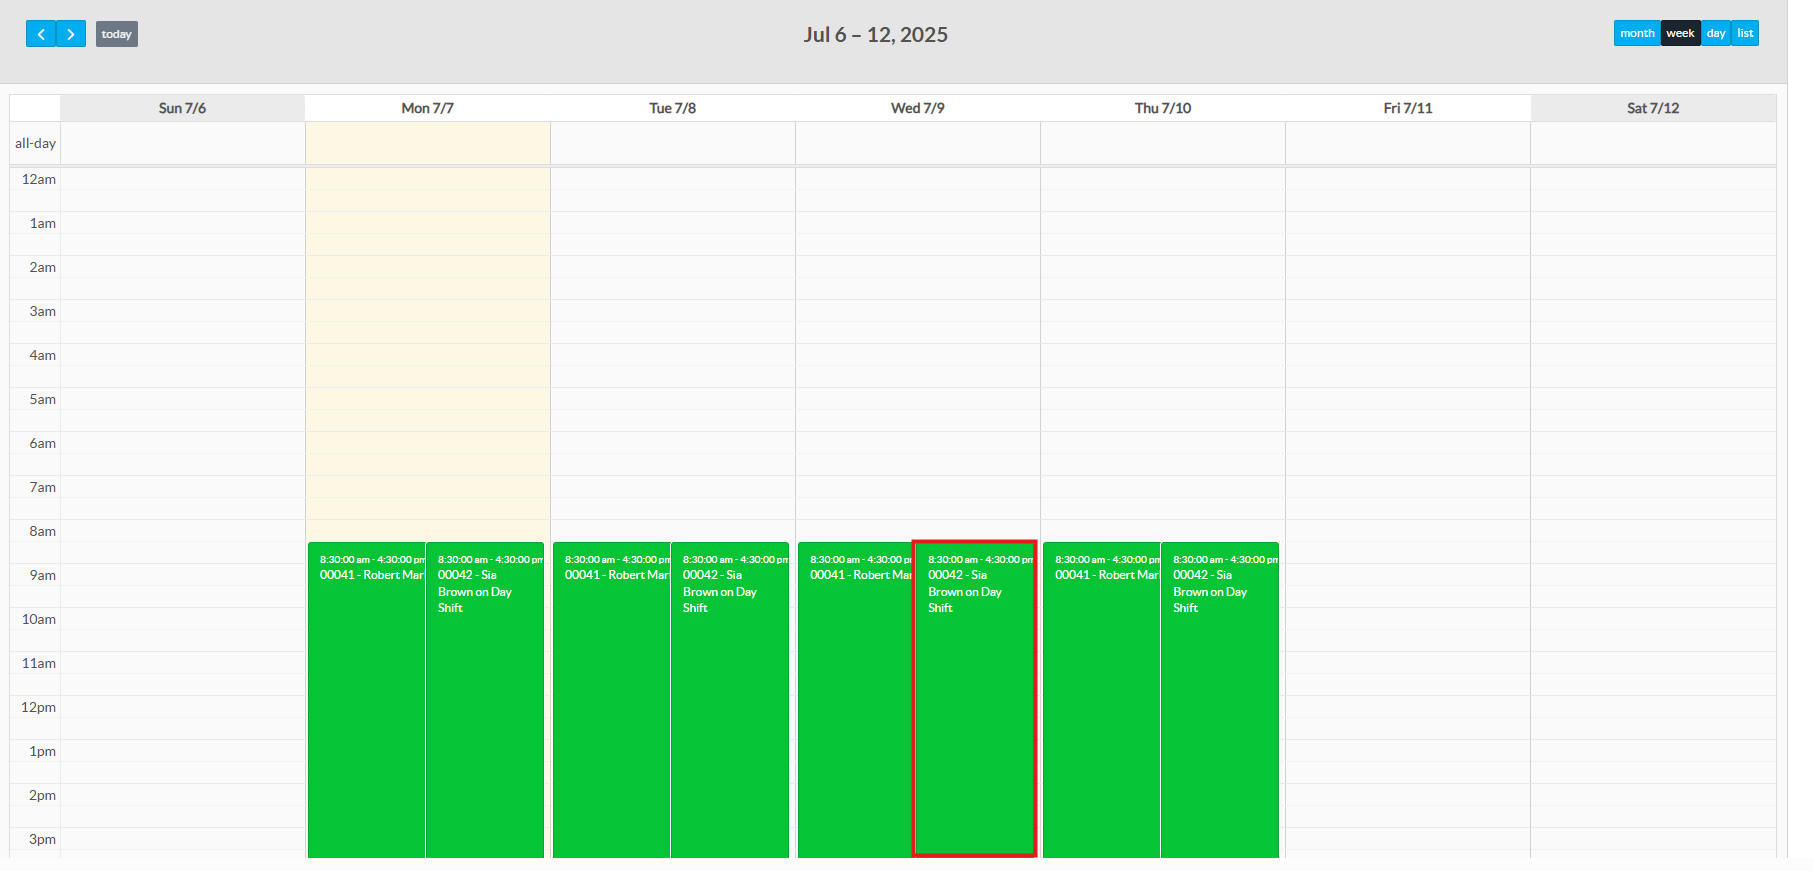
Step 3:
After you find the employee’s shift schedule, click the green section for the day you want to edit. In this case it will be Wednesday for the employee Sia Brown.
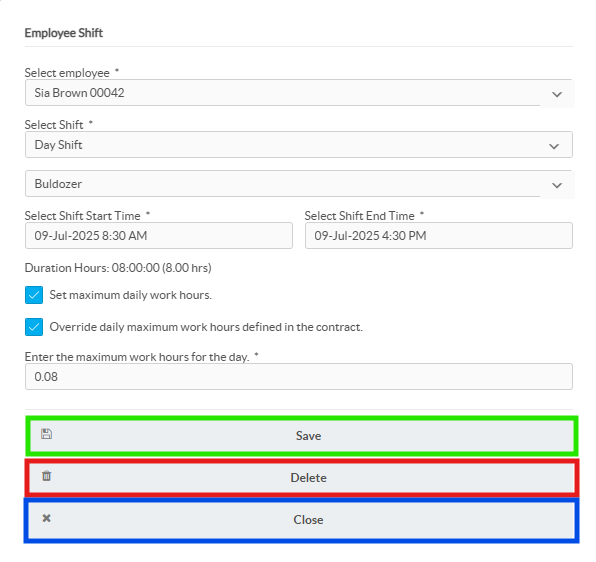
You will then be shown a prompt with information relating to the shift. Here you will be able to make the necessary edits to the shift. These include:
- The type of shift the person will be working on.
- The activity assigned the person for this specific shift.
- The shift start and end time.
- Changing the maximum daily work hours.
When you're done editing, click "Save". To discard your changes, click "Close". To remove the shift for the day, click "Delete".
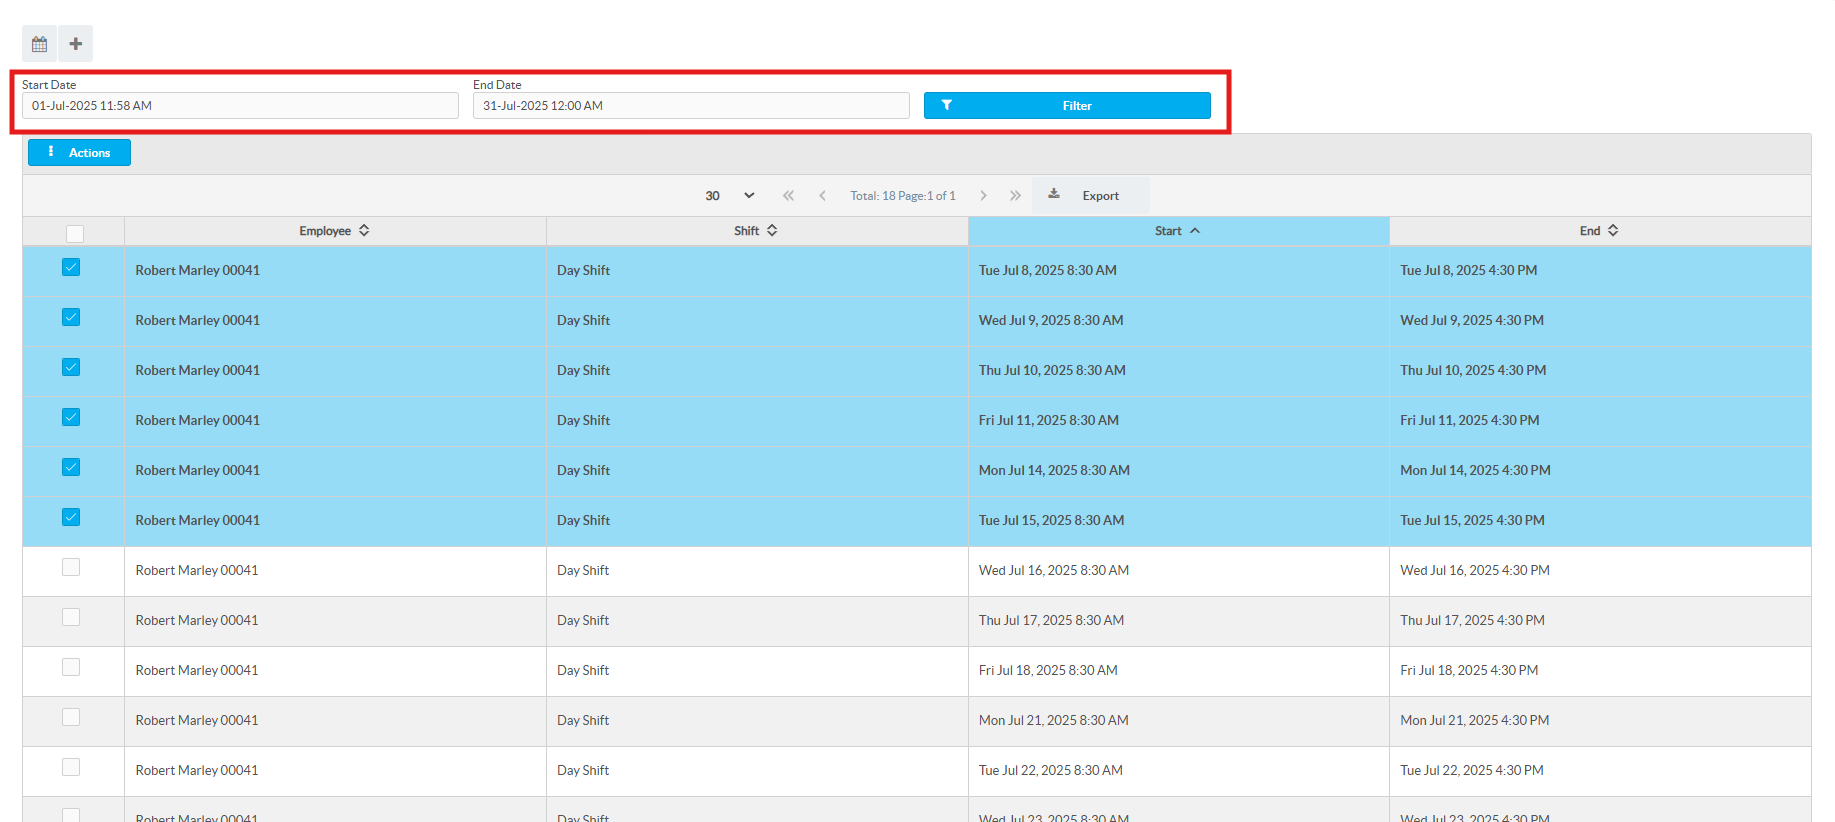
How do I delete multiple shifts at once?
Occasionally, we may need to remove multiple shift schedules for an employee. To do so we must first navigate to the "View Shift Schedule Page" and locate the employee who we need to edit. Click here to find out how.
After navigating to the "View Shift Schedule" page, click the list icon highlighted in the image below. This will change the view of the shift schedule so you can select multiple days.
Once the page has changed select the days you wish to delete. You may narrow your search for the days with the filter feature.
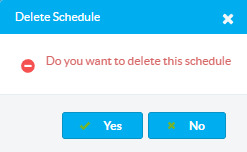
After selecting the days, click the button named "Action" and then click "Delete". A message will then be displayed to you confirming that you wish to delete the schedule, click yes to proceed.
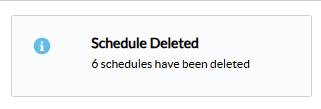
Finally a confirmation message will be displayed at the top of page stating that the schedules have been deleted.
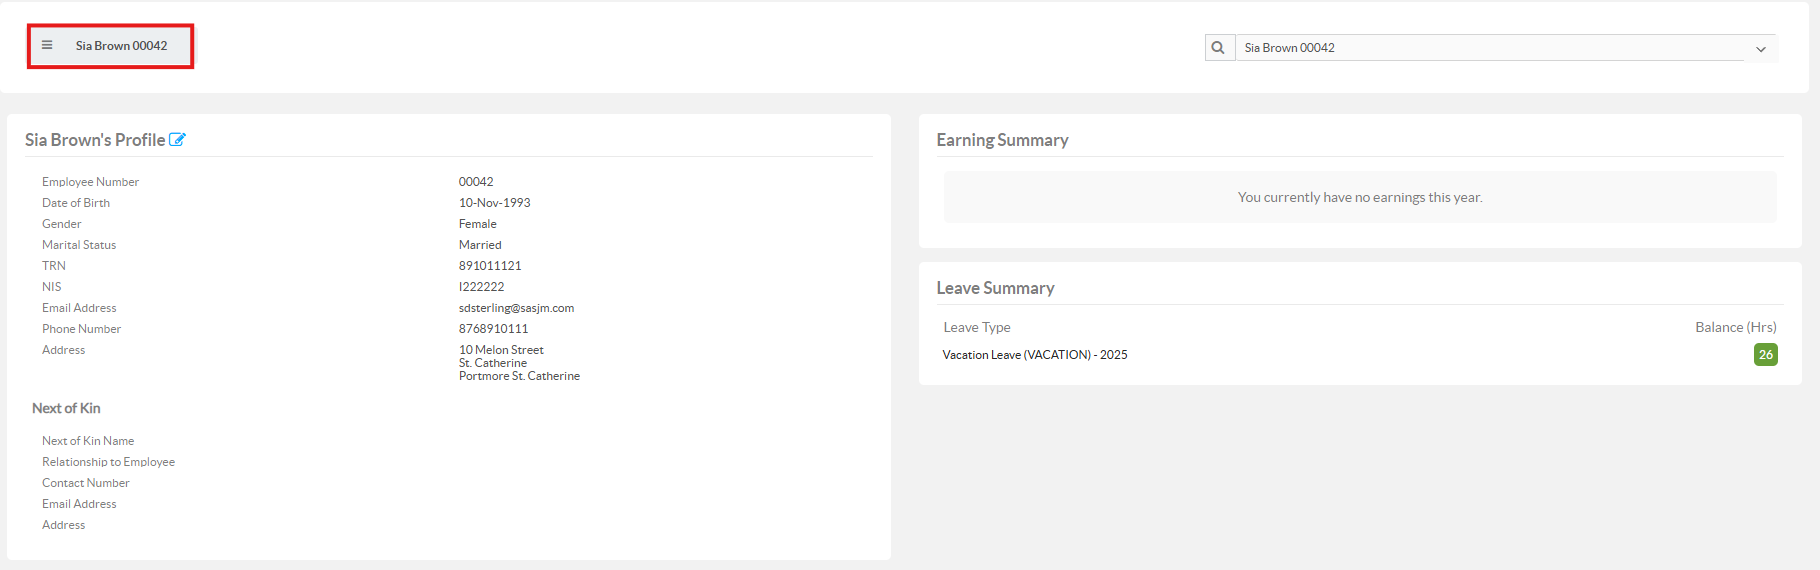
Creating a Single Timesheet entry
Step 1:
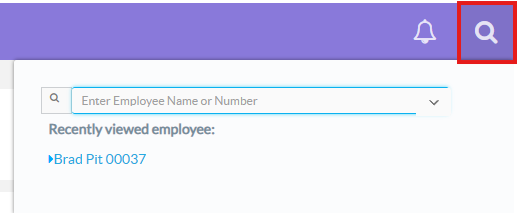
Firstly we need to access the profile for the staff we wish to add a time sheet entry. Navigate to the top of the page and click the "Find Employee" icon. Afterwards enter the name of the employee you wish to find.
Step 2:
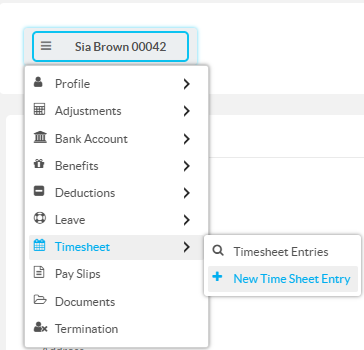
Afterwards you will be redirected to the employee's profile page. To create a new timesheet for this individual, locate the options menu at the top left of the page.
Click the button and hover you mouse over the timesheet option. You will see two more options displayed to you. Select "New Time Sheet Entry".
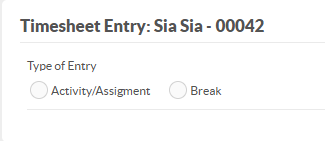
Then select the type of entry you wish to make. In this scenario we will select Activity/Assignment.
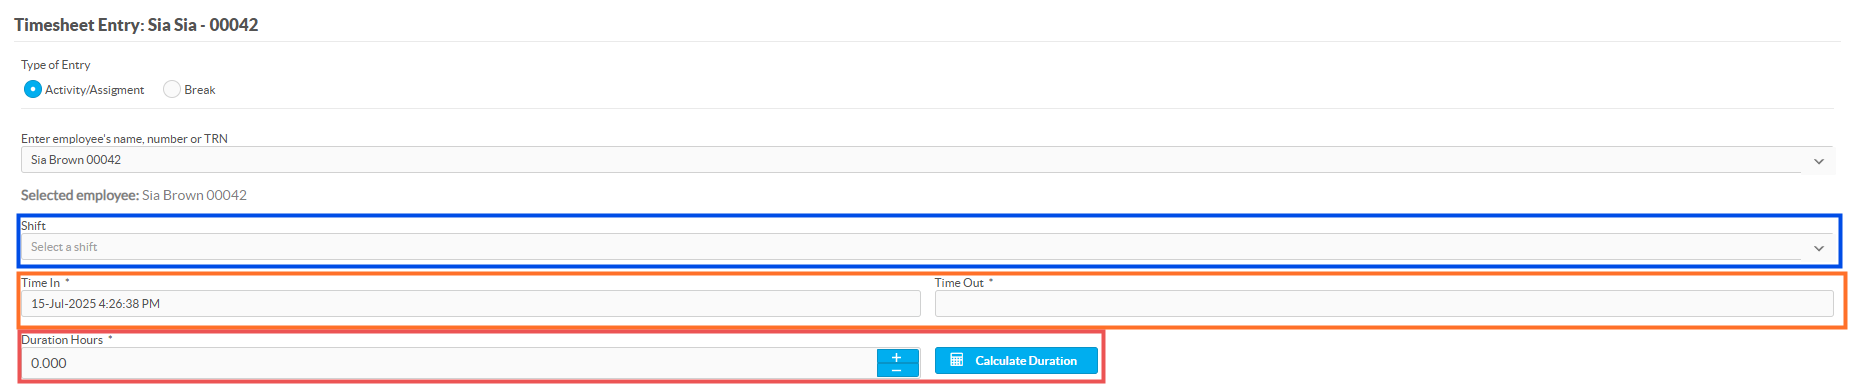
Step 3:
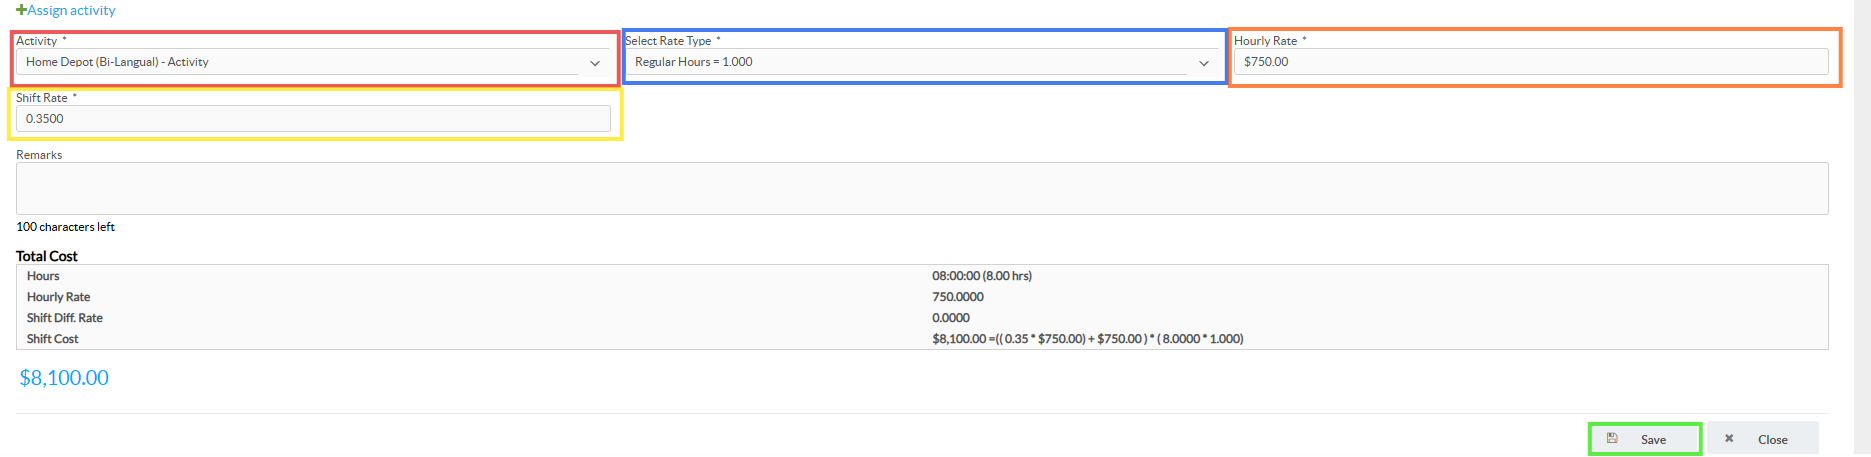
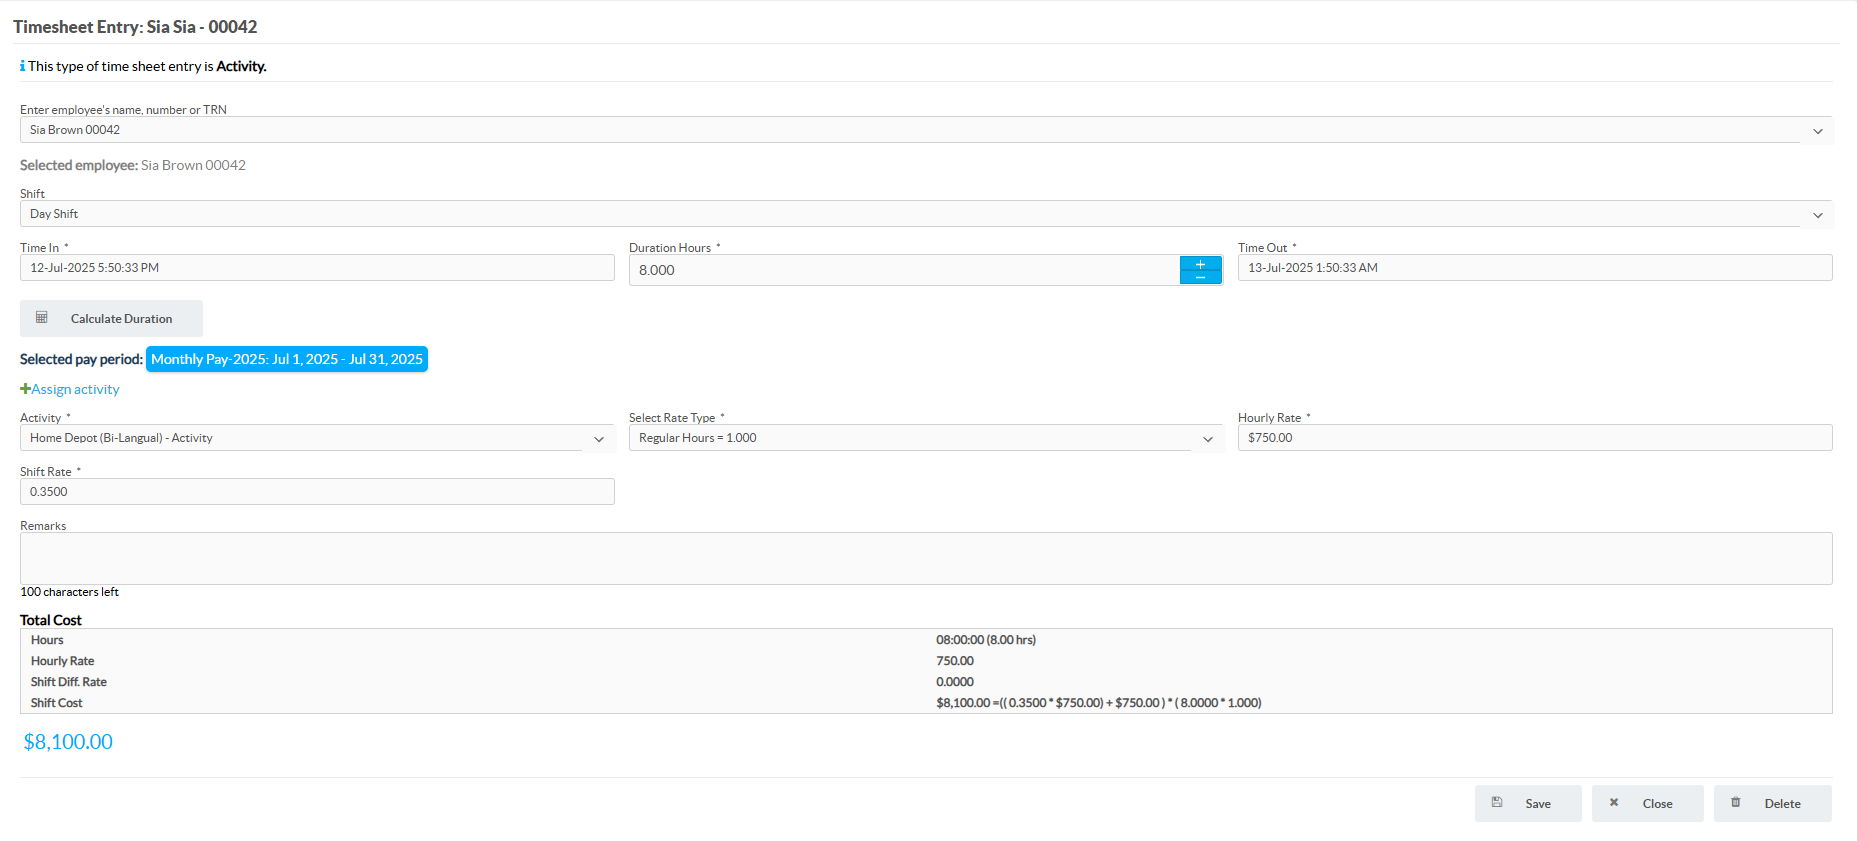
After selecting the type of entry you will be redirected to the timesheet entry page. The first step to creating the timesheet requires that you:
- Select the shift you want to assign to the employee.
- Select the start & end time of the timesheet entry.
Clicking "Calculate Duration" will tell you the total time the employee will work based on the dates entered for Time In & Out. It assumes an 8 hour work day.
Step 4:
The second step in logging a time sheet entry involves employers to:
- Assign a specific activity to the employee's timesheet.
- Select a the rate type (e.g. Regular Hours, Double Time, etc.).
- Enter the hourly rate for the employee.
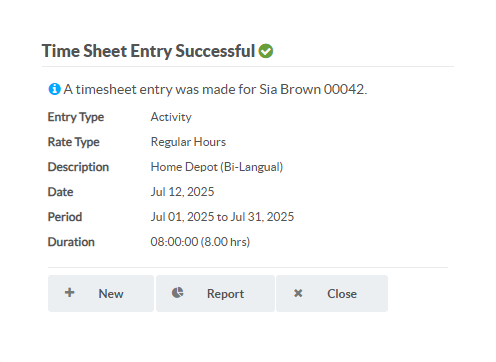
After filling out all the necessary fields and wish not to save what you have done click the "Close" button. Otherwise clicking the "Save" button will create the new timesheet entry and a confirmation message will be shown.
Creating a Batch Timesheet entry
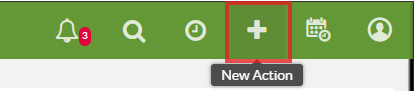
On the homepage, locate the “New Action” icon (a plus sign) on the sidebar at the top-right corner of the page.
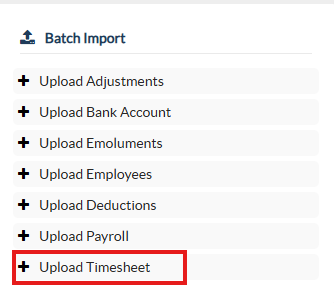
A menu with several options will then appear. Since we want to create timesheets in bulk, select “Upload Timesheet” under the Batch Import section.
On the Upload Timesheet Entries page, you’ll be given options for how to enter a batch of timesheets into the system. These include:
- Upload File - Use an Excel template from the Ladder website to upload timesheet data for multiple employees. Best for large teams with varied activities.
- Enter Batch - Manually create timesheet entries using the Ladder interface. One activity is assigned to all employees in the batch. Best for 1–15 employees with the same task.
- Editing Batch - Search for and edit entries made in a batch upload. Note: Once approved by the second approver, batch edits are locked. Edits must be made per employee.
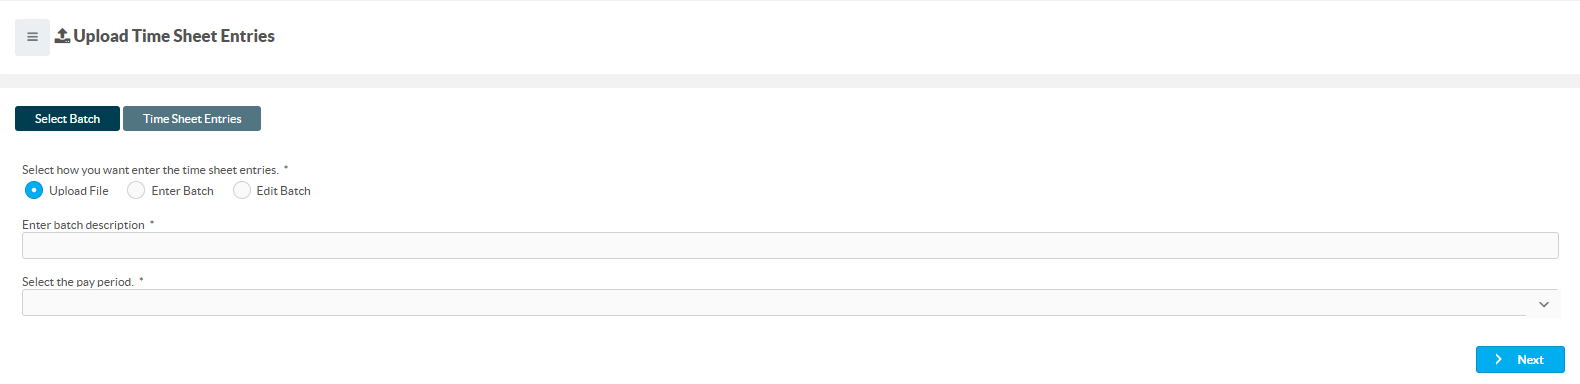
Uploading File
After selecting Upload File, you’ll be prompted to enter a brief description of the batch upload and choose the pay period to which the timesheets apply.
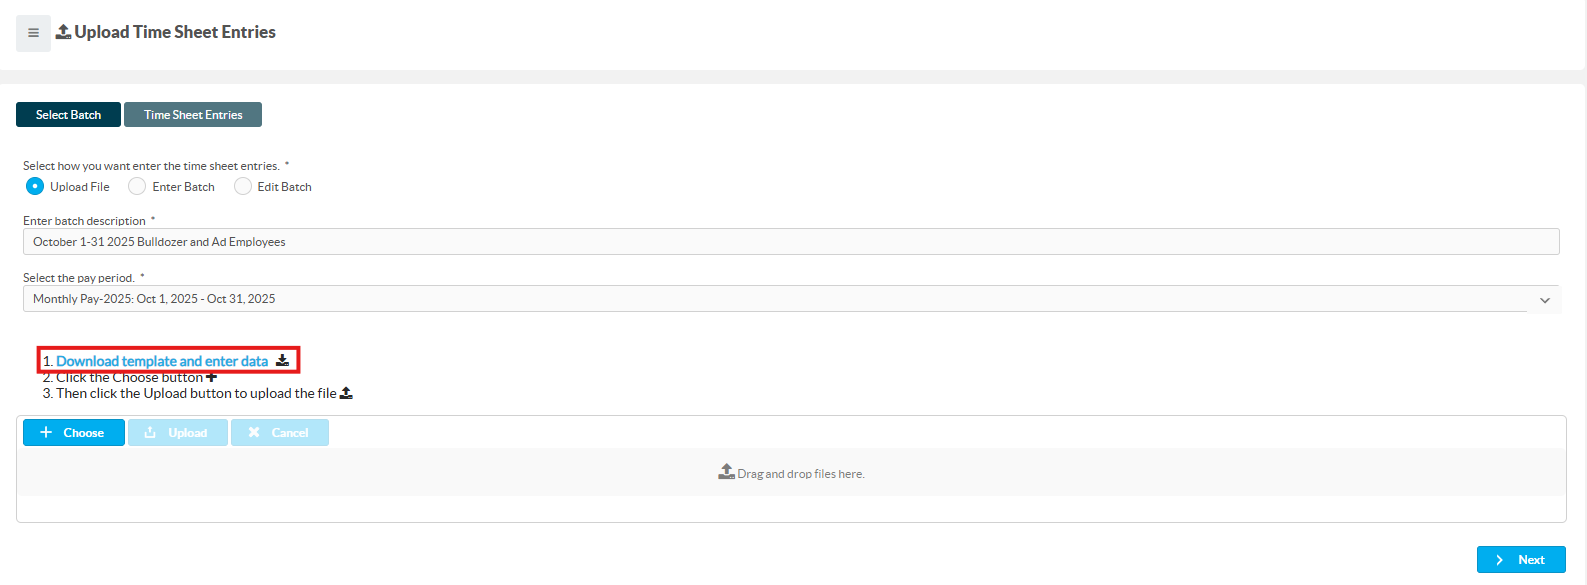
Now we need to download and enter the data into the excel file. Click the highlighted text that says “Download template and enter data”, where the download for the template excel file will start automatically.
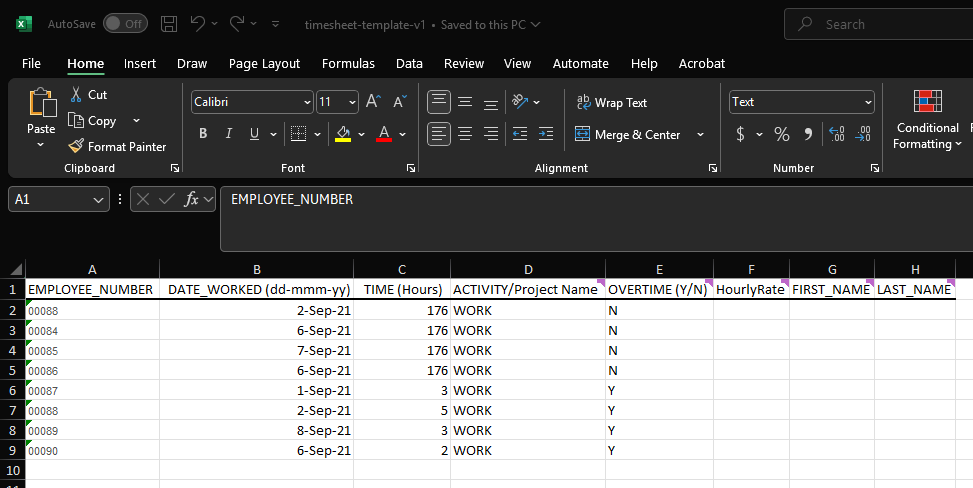
The file will be titled "timesheet-template-v1". Open the excel file and enter the relevant information into the fields. Then save the file.
- Employee Number - This must include the employee number assigned to the employee on the Ladder system. This can be found by searching for the name of the employee.
- Date Worked - This must include the day, within the period you selected, the employee would being to work.
- Time (Hours) - This must include the duration in hours for the task/project/leave. This field assumes an 8 hour work day.
- Activity/Project Name - This must include the name of the task/activity/project/leave you want assigned to the employee.
- Hourly Rate - Enter the employee’s hourly pay rate. If left blank, the system will use the rate specified in the employee’s contract. The currency must match the company’s default currency on Ladder.
Note
The employee first and last name are the only optional fields. All other fields must be filled out before upload to the Ladder system. For anymore clarification, you can contact us at telephone: (876)555-5555.
Afterwards, navigate to the Ladder System and click "Choose". Then double click on the excel sheet you just saved.
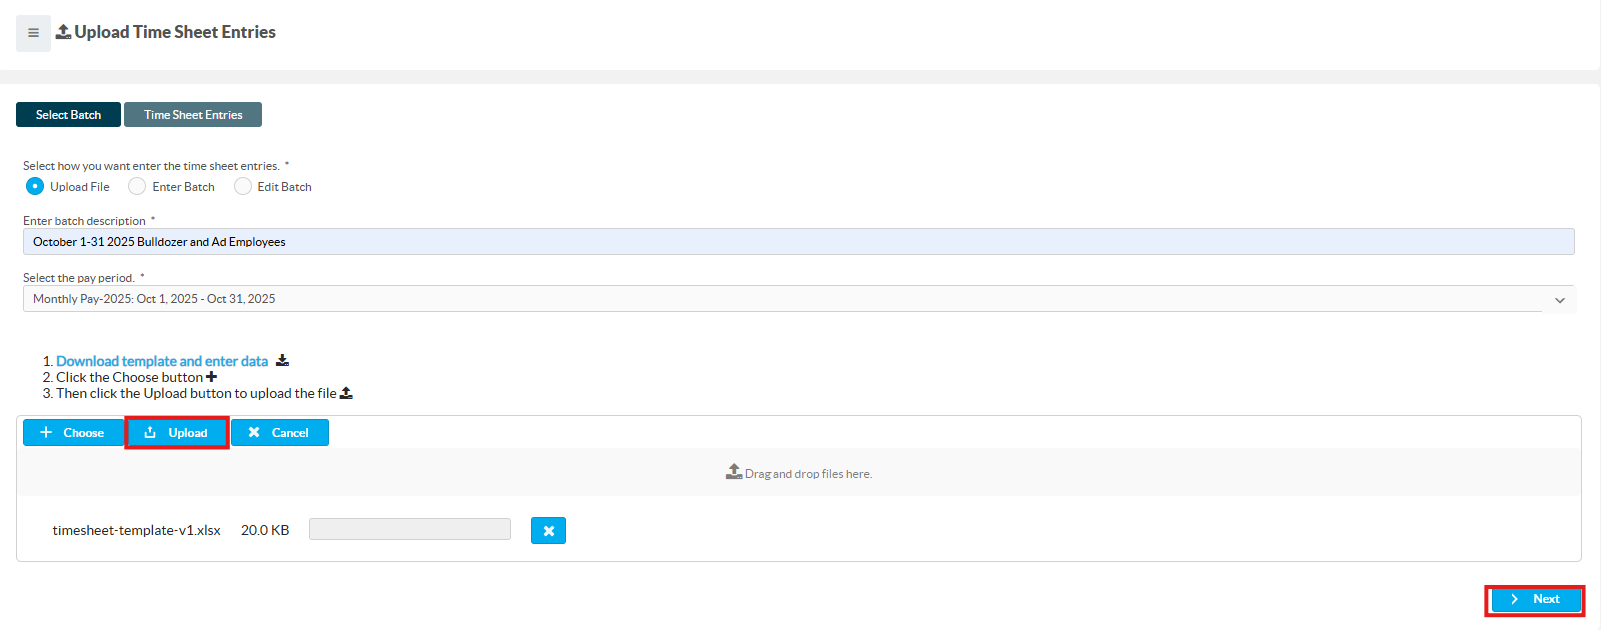
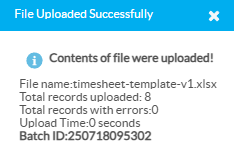
Finally to upload the file to the Ladder System click the "Upload" button.
A message will be displayed to you to confirm a successful upload.
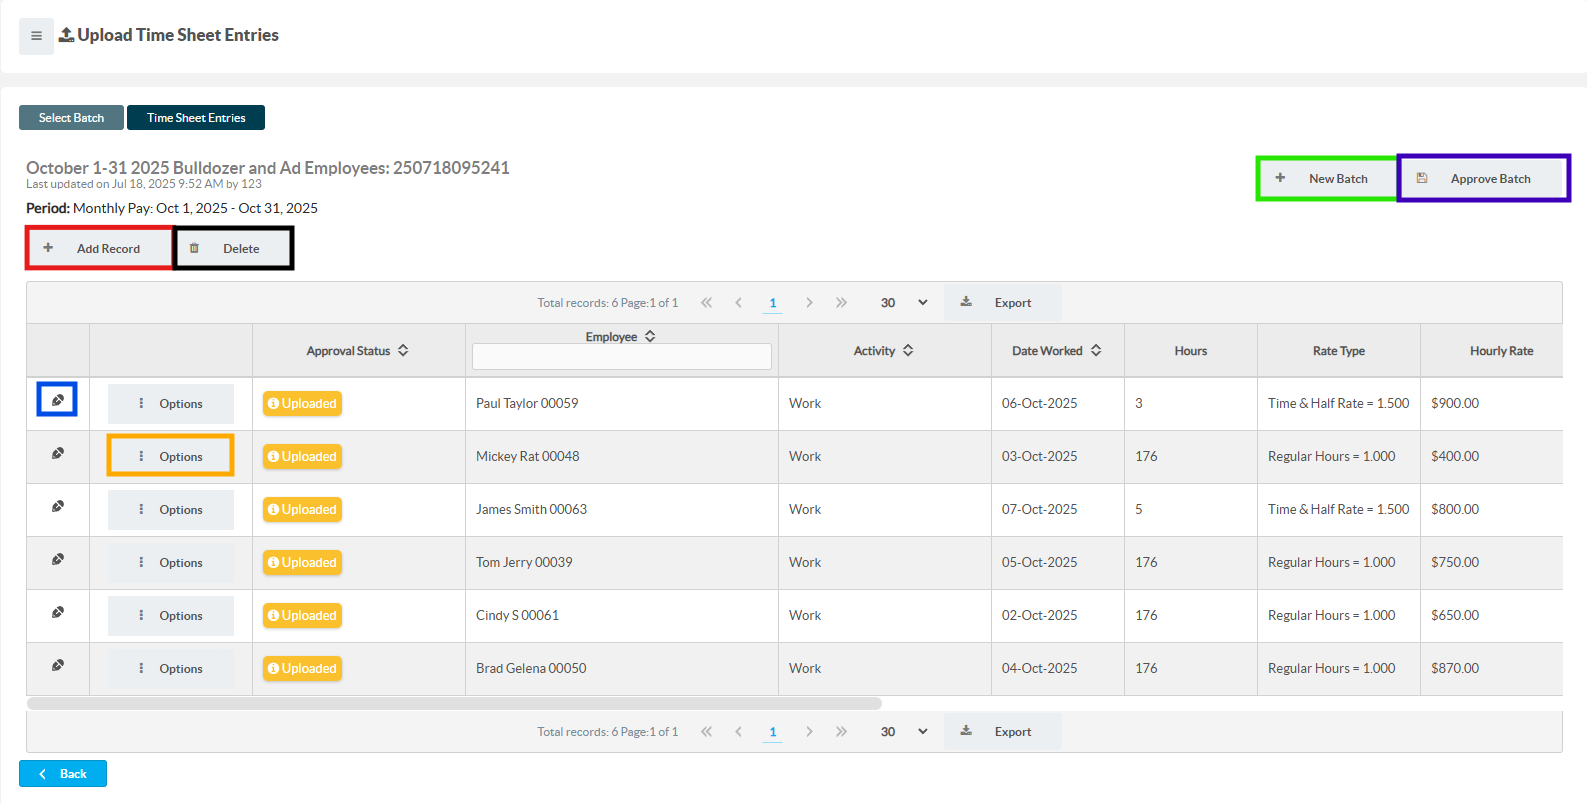
After selecting "Next", you will be redirected to the batch upload interface. Here you can review the entries before they are added to the system. On this screen, you’ll see several available actions:
- Add Record – Adds a new entry where you can assign an employee to the batch timesheet.
- Delete – Deletes the entire batch timesheet entry.
- New Batch – Restarts the batch upload process. The previous batch information will be saved automatically.
- Approve Batch – Finalizes and submits the timesheet information to the employees’ accounts.
- Edit Record – Allows you to modify the details of an existing record.
- Options Button – Provides additional actions for individual records, such as deleting or approving them.
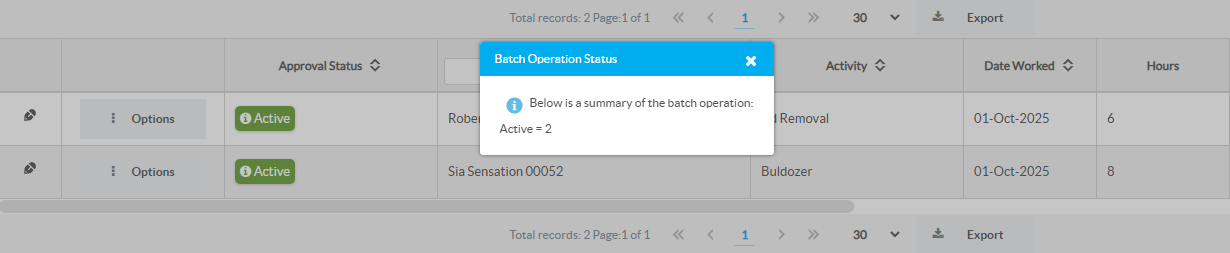
Finally If all entries are in good standing, click "Approve Batch".
Enter Batch
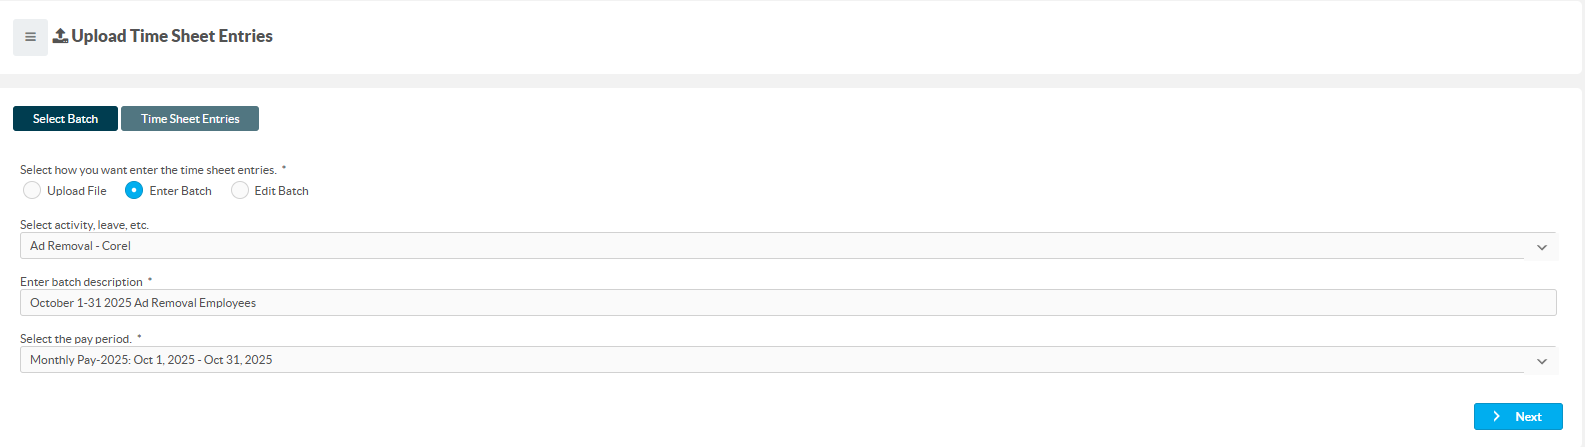
After selecting Enter Batch, you’ll be prompted to select an activity/leave/break that will be assigned to the employee’s timesheet. In this scenario we will select Ad Removal.
Afterwards enter a short description and select the relevant pay period. Finally click “Next”.
After selecting Enter Batch, you will be redirected to the batch upload interface. On this screen, you’ll see several available actions:
- Add Record – Adds a new entry where you can assign an employee to the batch timesheet.
- Delete – Deletes the entire batch timesheet entry.
- New Batch – Restarts the batch upload process. The previous batch information will be saved automatically.
- Approve Batch – Finalizes and submits the timesheet information to the employees’ accounts.
- Edit Record – Allows you to modify the details of an existing record.
- Options Button – Provides additional actions for individual records, such as deleting or approving them.
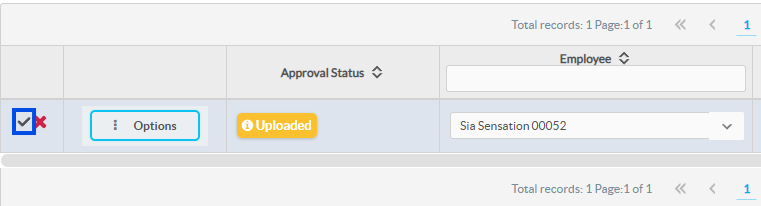
To begin assigning timesheets, click the Add Record button. A new record will be created. To edit this record:
Click the pencil icon beside the record and enter the following information:
- Employee's Name.
- Assigned Activity.
- Number of hours to be worked per day.
- Rate type. (e.g., Double time, Time & Half)
- Hourly Rate.
- The shift the employee is schedule to work.
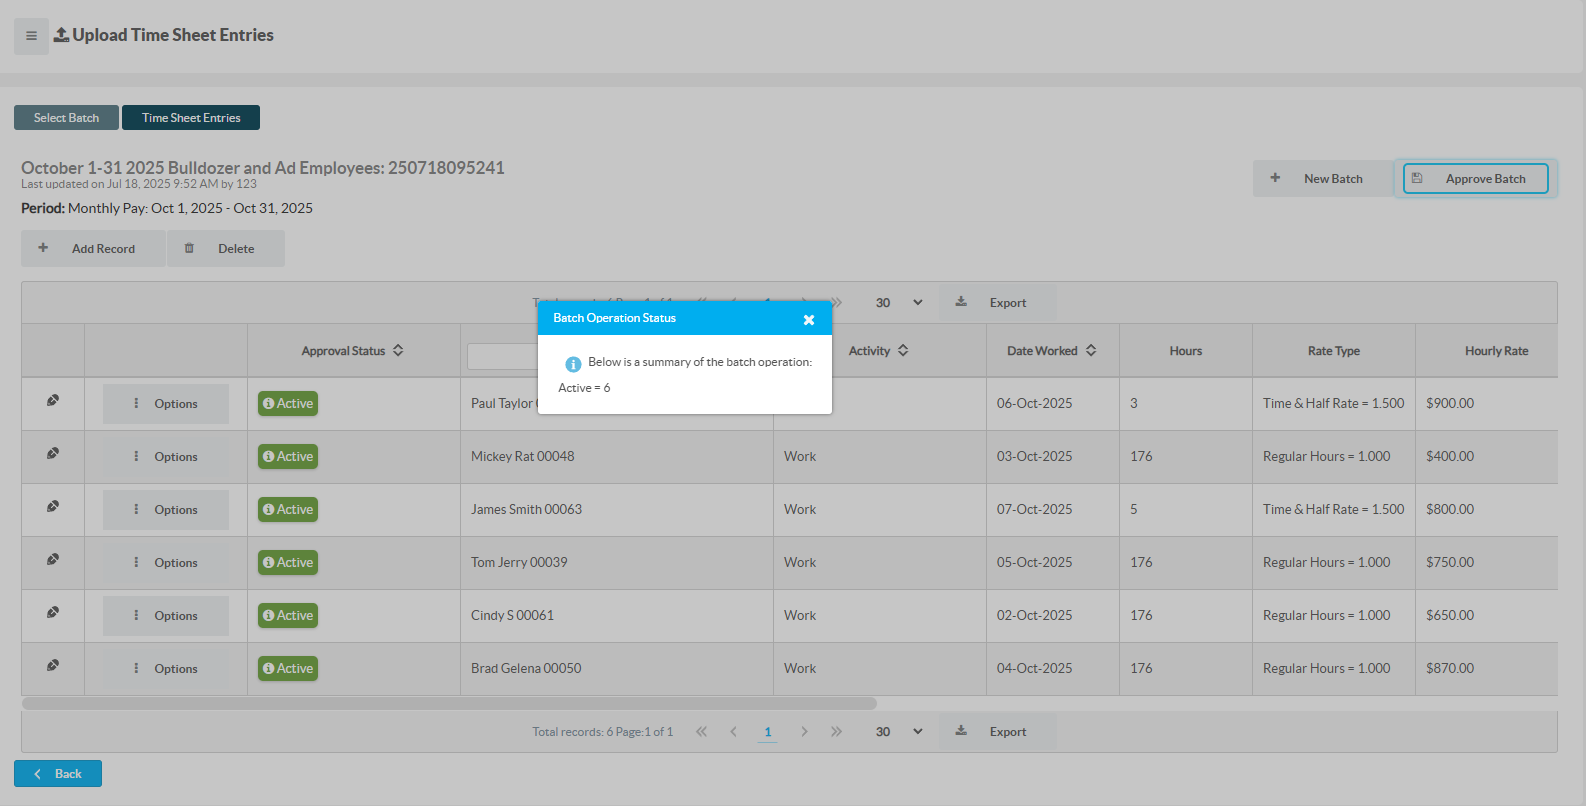
Afterwards click the checkmark beside the entry to save your edits. Then click Approve Batch.
A confirmation message will appear and your entries will now be active on the system.
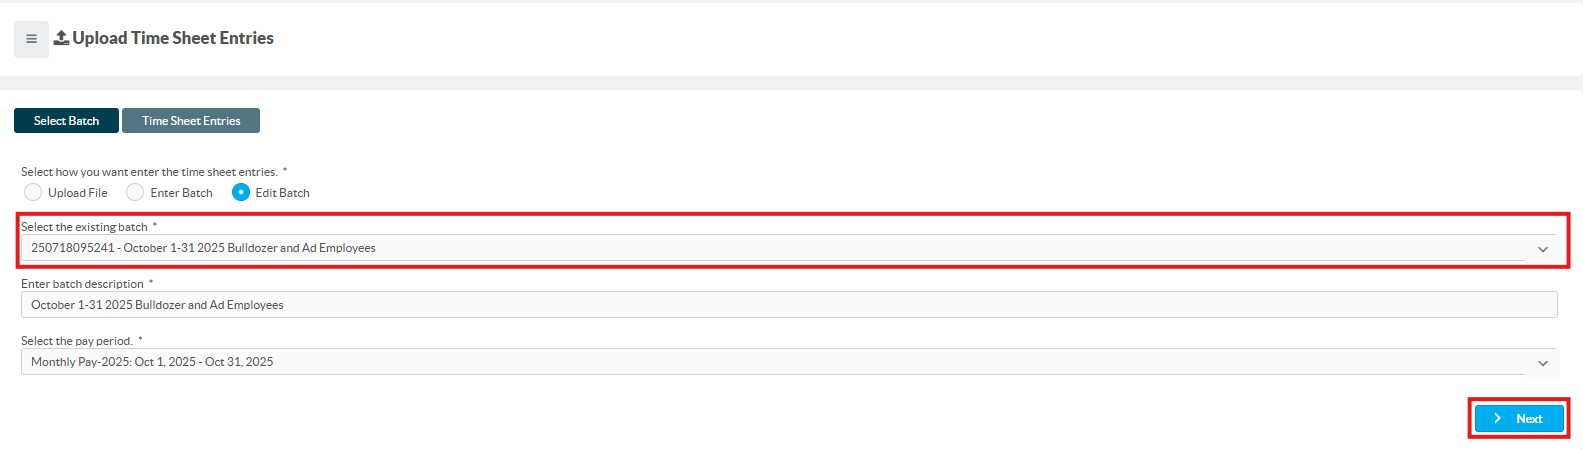
Editing Batch
After selecting "Edit Batch", you’ll be prompted to choose an existing batch. This will auto-fill the remaining fields. Once a batch is selected, click "Next"
After selecting "Next", you will be redirected to the batch upload interface. On this screen, you’ll see several available actions:
- Add Record – Adds a new entry where you can assign an employee to the batch timesheet.
- Delete – Deletes the entire batch timesheet entry.
- New Batch – Restarts the batch upload process. The previous batch information will be saved automatically.
- Approve Batch – Finalizes and submits the timesheet information to the employees’ accounts.
- Edit Record – Allows you to modify the details of an existing record.
- Options Button – Provides additional actions for individual records, such as deleting or approving them.
Editing and Deleting a timesheet
Step 1:
To edit a timesheet we must first search and select the employee whose timesheet you wish to edit.
Navigate to the top of the page and click the "Find Employee" icon. Afterwards enter the name of the employee you wish to find.
Step 2:
Afterwards you will be redirected to the employee's profile page. To edit their timesheet, locate the options menu at the top left of the page.
Click the button and hover you mouse over the timesheet option. You will see two more options displayed to you. Select "Timesheet Entries".
Step 4:
The employee's timesheet page will be displayed. Here you will be able to view all past and ongoing timesheets for the employee. You can filter your search for a specific pay period by clicking the "Pay Schedule" field at the top left hand of the screen.
After locating the entry you want to edit, press the down arrow. Then click "Options" and then "Edit".

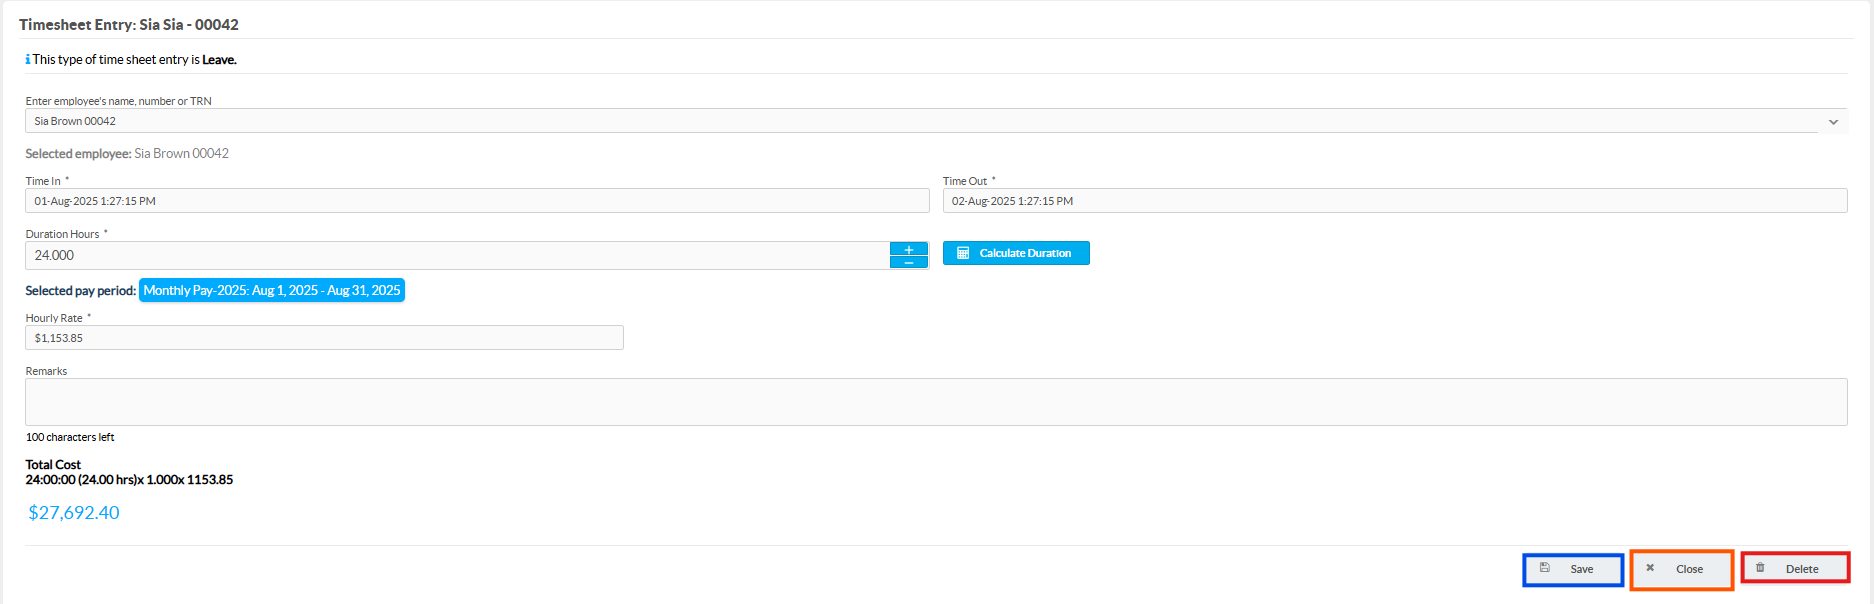
This will take you to the "Timesheet Entry" page where you will be able to make your edits to the employee's timesheet.
If however you wish to delete the timesheet entry simply click the "Delete" button.
Leave Request
This section will cover the creating, viewing and editing of a Leave Request. There are two ways to create a leave request. Single and Batch creation. To learn how to do a batch creation click here.
Creating a Single Leave Request
Step 1:
To add a leave request, first access the employee’s profile. Click the "Find Employee" icon at the top of the page, then enter the employee’s name.
Step 2:
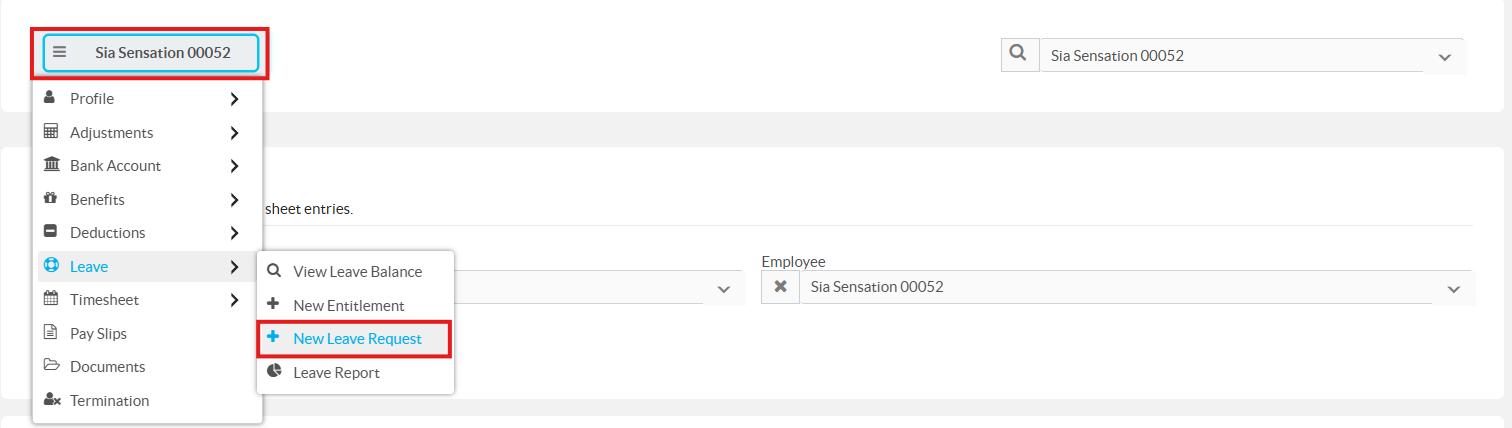
You’ll be redirected to the employee’s profile page. Click the "Options" menu at the top left, then hover over "Leave". From the dropdown, select "New Leave Request".
Then select the leave type available to the employee. In this scenario we will select Vacation Leave.
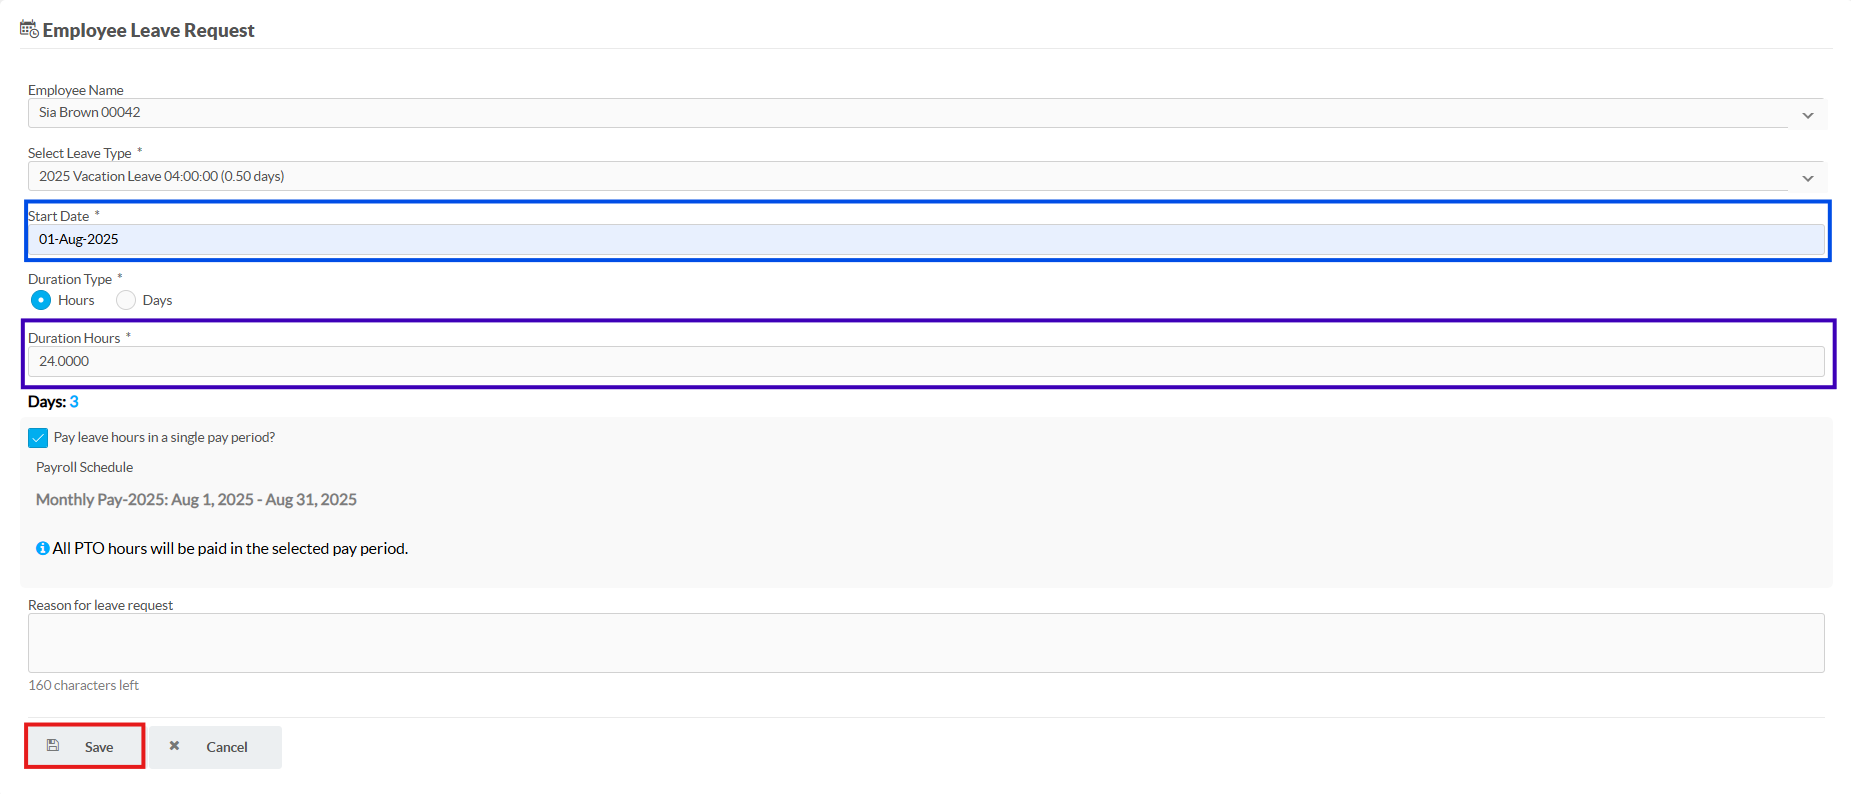
Step 3:
After selecting the type of leave, you will be required to enter:
- The Start date of the Leave.
- The duration of the Leave.
- Whether payment of leave should be done in one pay period.
Note
Need to explain paying in one period.
Finally after filling out all the necessary information, click “Save”. This allows the entries to take effect on the system.
Editing and Viewing Leave Requests
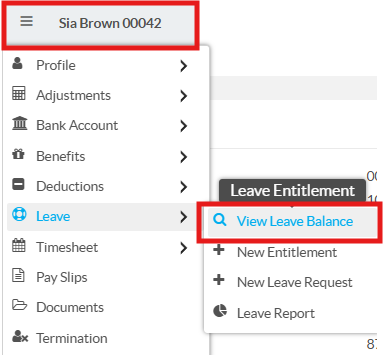
Step 1:
On the employee's profile page, click the "Options" menu at the top left, then hover over "Leave". From the dropdown, select "View Leave Balance".
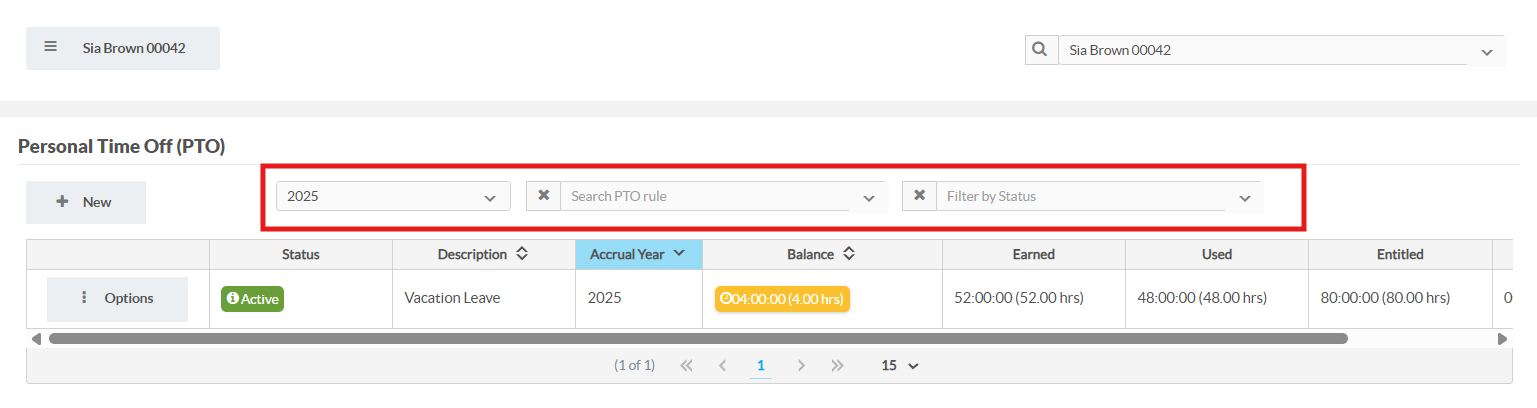
Step 2:
You will be redirected to the Personal Time Off page (PTO). Here we can search for the record we want using the search options as highlighted below.
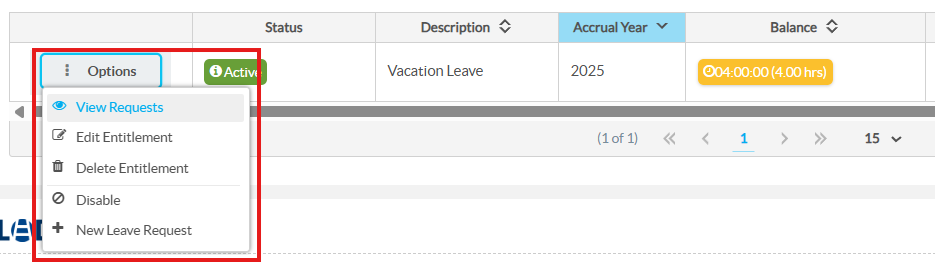
Once the PTO rule (eg. Vacation Leave, Maternity Leave, Sick Leave) is found by clicking the “Options” button beside the entry. Then select “View Requests”.
Step 3:
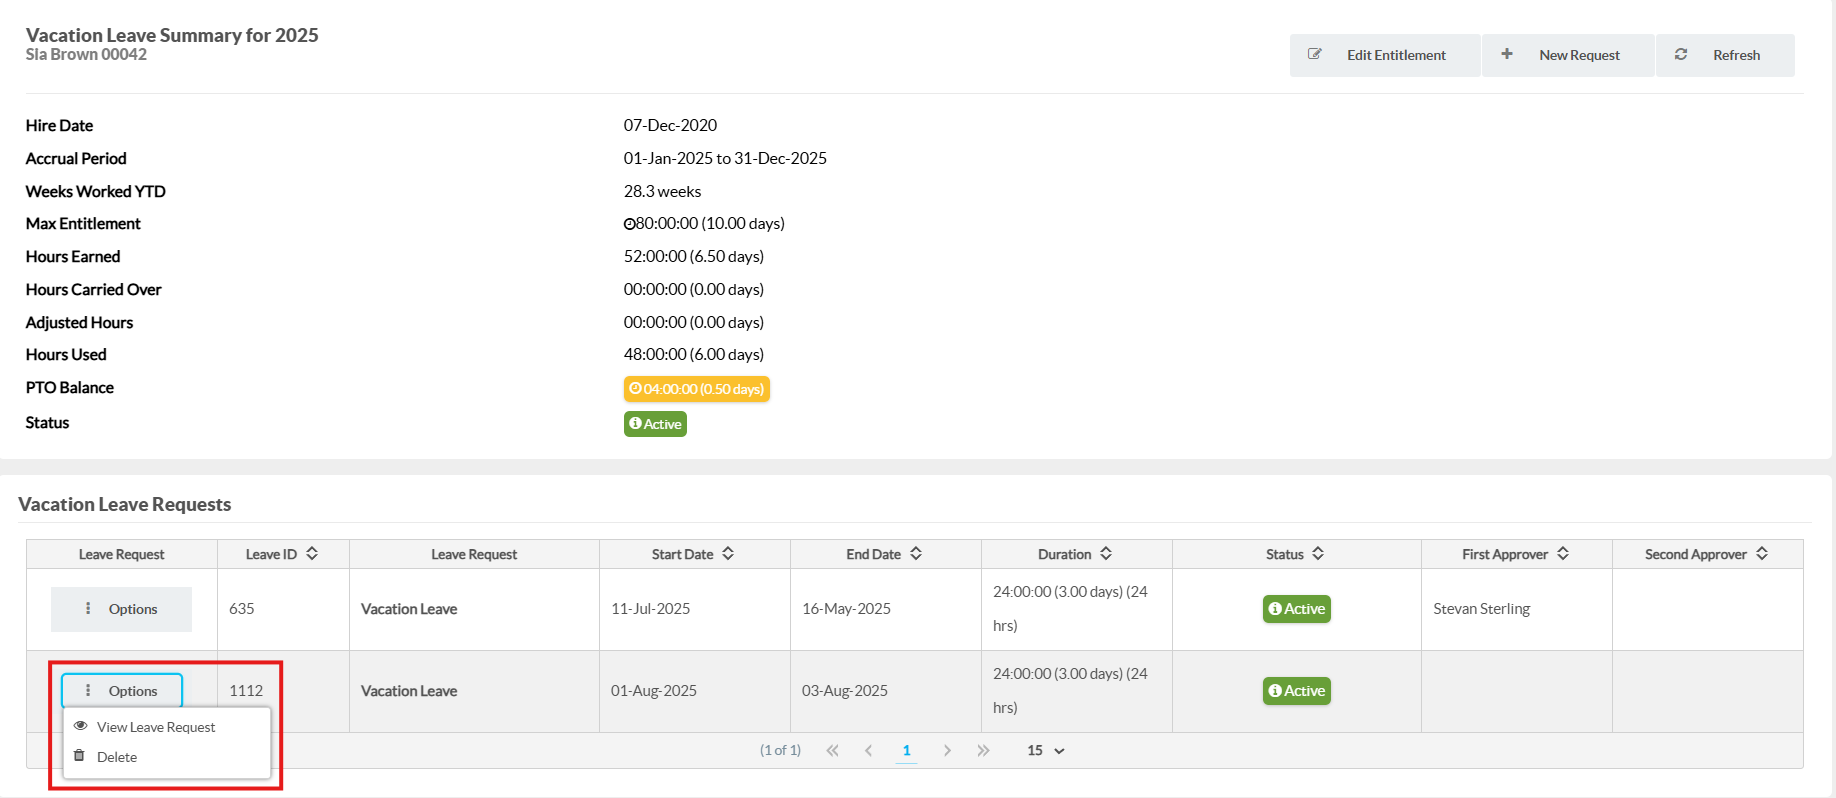
Now you are able to view all leave requests for that specific PTO rule. Locate the request that you want to view. Then click the “Options” button beside the record and click view leave request. You should be redirected to a new page with the leave request information.
Step 4:
You should be redirected to a new page with the leave request information. To edit the Leave request click the button with three dots and click "Edit".
You will be taken to a page where you can edit the leave request. After making changes, click Save to apply them. Click Close to exit without saving.
Step 1:
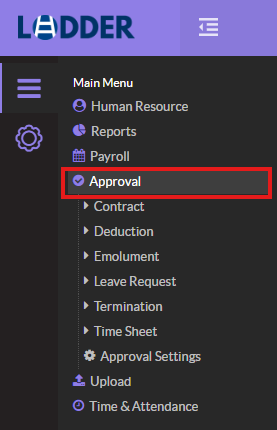
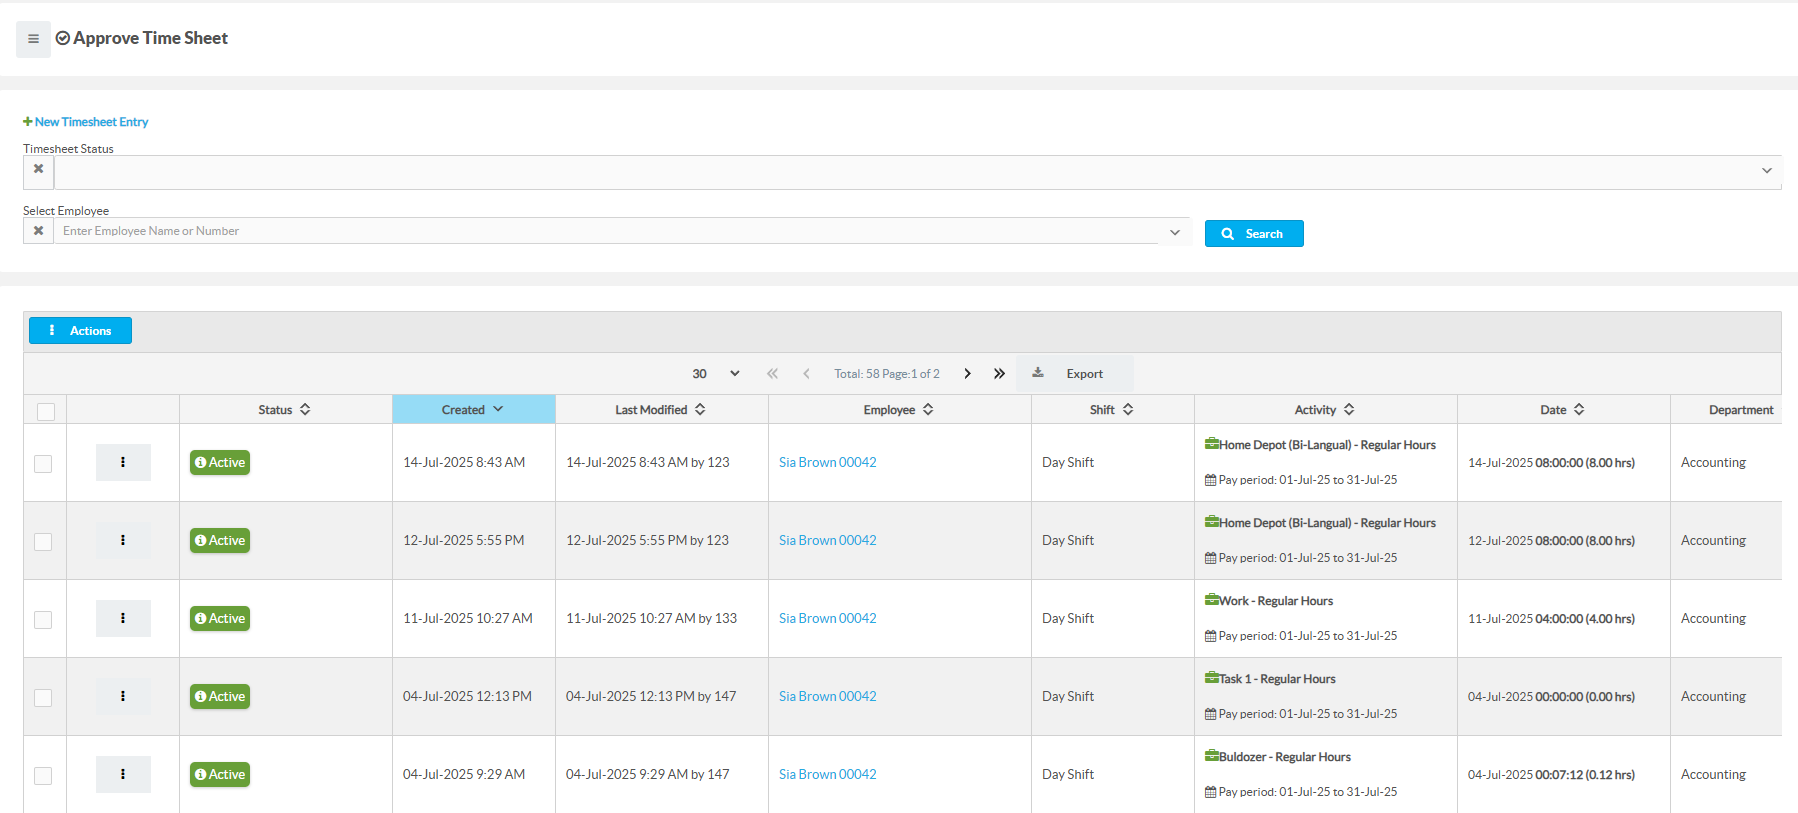
Navigate to the main menu and select "Approval". A list of options will be displayed, select the one needed. In this scenario we will select "Time Sheet".
Where you will be redirected to the Approval page.
Step 2:
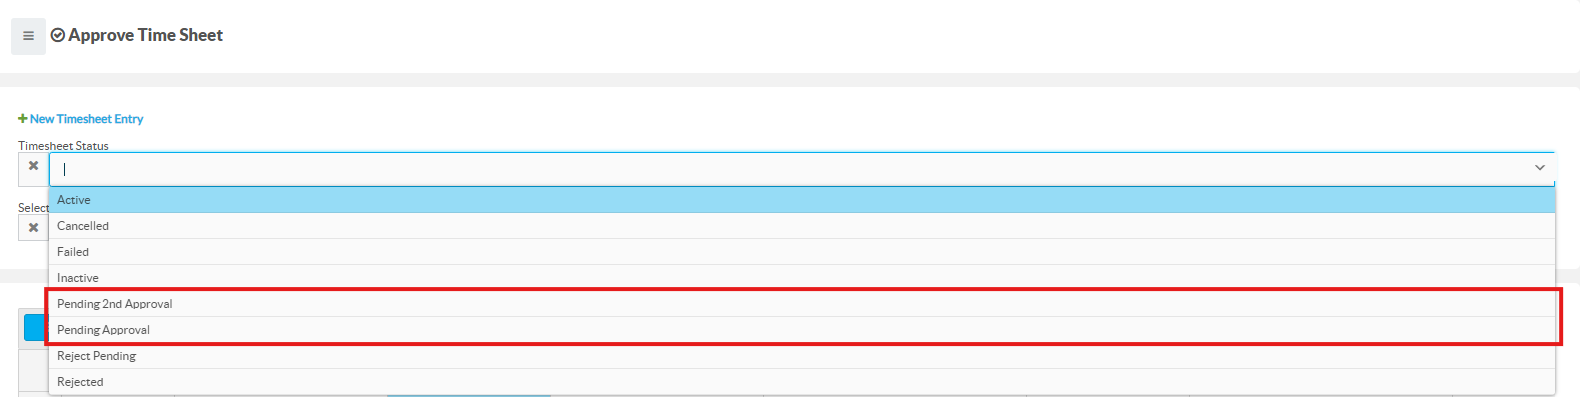
Assuming a timesheet entry is already created and pending approval, use the search field and look through the options for "Pending Approval" and/or "Pending 2nd Approval".
To narrow your search to a specific employee, enter their name into the "Select Employee" field.
Step 3:
After narrowing your search, you should be shown an entry to be approved. Click the three dots beside the entry to view available actions. These include:
- Approve the entry.
- Reject the entry.
- Edit the entry.
- Delete the entry.
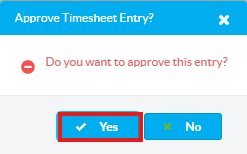
In this scenario we will select "Approve".
A confirmation message will appear. Click "Yes" to proceed. A similar message will also appear if you select the "Reject" or "Delete" option.
Upon doing so you would of successfully approved an entry.


